Border Corner
Border Corner feature is a comprehensive method for placing and resizing patterns to fit the border and corners precisely.
Border Corner will resize and place two corners, the border patterns between them, and the side borders if they fit. This technique will resize the border and corner patterns to fit the space and connect them so they stitch in one continuous path.
VIDEO | Border Corner Setup
About Border Corner
- CreativeStudio creates a new Quilt Group for this feature
- Border Corner displays a setup window on the right side of the screen that includes a directional drawing to clearly indicate which points are needed
- On-screen prompts instruct where to select points that define the quiltable border space
- Provide the info required in the Setup section, and click OK when done
- There are two types of patterns that are designed specifically (the end of one pattern connects precisely with the beginning of the other) for borders:
-
- Borders are repeat patterns that have relatively straight upper and lower edges (they are not deeply nested)
- Corners are patterns designed to wrap around a 90 degree angle, connecting the border patterns
-
Selecting the Patterns
Select the corner pattern first, then the border pattern while holding the Ctrl key down on your keyboard. Select your patterns prior to selecting Border Corner. d
No Matching Corners
Not all border patterns have a matching corner. If this is the case, use the Repeat Pattern Feature within the border boundary to place patterns. This process is the same as that demonstrated in the video Turning a Quilt for Side Borders found at the end of this article.
1. Draw a boundary.
2. Place the patterns in the boundary to get the size.
3. Adjust the pattern ends at the corners. Note: It is a good idea to draw a diagram of the entire quilt to be sure the patterns fit in the side borders.
Bottom Borders
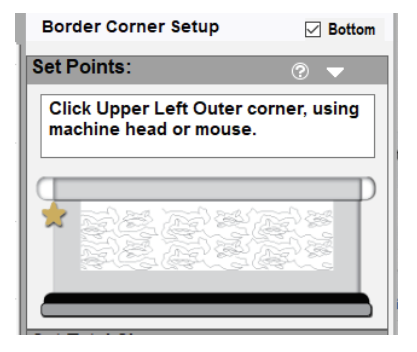
The default setup is for a top border. To set up a bottom border, click the bottom button found at the top of the Border Corner Setup window. The setup prompts will adjust accordingly.
VIDEO | Bottom Border Corner Setup
Border Corner Step by Step (Top Border) |
|
|
Select both patterns (border and corner). First, select the corner pattern then hold the control key (Ctrl) down while selecting the border pattern. If only one pattern is selected, CS assumes it is the corner pattern, and places it accordingly. Click the Border Corner icon.
|
 |
|
Notice the three prompts that all say to click the upper left corner along with a visual reference. The first click is the upper left outside corner. Place your machine head with the needle in that location and click OK with the machine head keypad.
|
 |
|
The prompts change to upper right outer corner. Move the machine head to this location on the quilt and select OK. Then repeat the process with the lower right outer corner near the belly bar of your table. The next click is the lower left outer corner. You will notice a boundary appears for the outer corners. |
 |
|
Next, click the inner corners. |
 |
|
As soon as the lower left interior corner is clicked, the boundary is completed and patterns will appear at the top of the boundary. Enter the border length. This is the length of the outer edge from the very top of your quilt to the bottom of the quilt if the border is an outside border. |
 |
|
In this example, the length is 40 inches. As soon you hit enter on the keyboard, CS will size and place as many side repeats as fit in the quiltable space. The patterns may not fill the entire side border. This is to be expected because CS sized the patterns perfectly for repeats to fill the space between the upper and lower corner patterns. |
 |
|
Adjust the Margin if needed to increase or decrease the space around the patterns. You can also opt for the patterns to not be connected (stitched continuously). |
 |
|
Corner Orientation is how the pattern corner was built and meant to be used. Inspect the corner pattern and how it is sitting in the preview. In this example, it looks like it is built for upper left. If it is designed different, change the orientation type to upper right, lower right, or lower left. |
 |
|
Corner Type is how the corner pattern is shaped. Most are shaped like Ls but you may need to change to square, square oriented or angled to get the look you are after. |
 |
VIDEO | Turning a Quilt for Side Borders


 Start with the upper left inner corner then move to the upper right inner corner, lower right inner corner and lower left inner corner as prompted. An interior boundary will appear.