Check for Updates
Check for and perform CreativeStudio updates to ensure you are using the latest version of software
Check for Updates
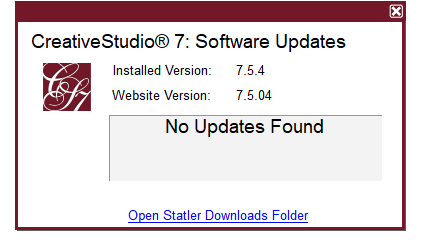
Gammill is continuously striving to produce the highest quality software for our quilting family and therefore provides regular updates to CreativeStudio. If your computer is connected to the internet, you will receive a prompt whenever an update is available. A message appears asking if the updates are to be installed at this time. Follow the prompts to update the software. The release notes will summarize what has changed. If special instructions are required, they will be documented there.
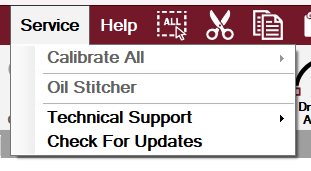
You can also check for updates under Service to ensure you are using the latest version of software.


When an internet connection is not available, the software update files must be downloaded to a different (non-Statler) computer and transferred to the unconnected computer.
Continue to download the software, then copy it to a thumb drive to transfer it to your genuine Statler computer. The install process is described below.
The software can be used on a non-Statler computer, (in Stand Alone Mode - SAM) to create projects and/or patterns. SAM was intended to help quilters be more productive by allowing design work to be done while the stitcher is working.
Updating your Statler or SAM Computer
Video | Checking for Updates Preview
Video | Updating CreativeStudio 7
Prior to Updating
- Finish and save any projects you have in progress.
- Sync to the PatternCloud (If totals don’t match, update to the latest CS).
- Check for Microsoft updates on your computer. Run updates until you receive the message that there are no more updates available.
- Try to do the update during Gammill Tech Support business hours which are 8 a.m. to 8 p.m. central time seven days a week. To reach Tech Support, call 417-256-5919, Option1.
- Please read the installation instructions and download notes below prior to download.
- Using CreativeStudio in stand alone mode (SAM) requires a Windows PC.
Updating Steps
- Ensure your computer is online.
- Launch the CreativeStudio program. You will receive a notification that the new update is available.
- Click ‘Download and Install’ to begin the process. If you do not receive this message, please click ‘Service’, ‘Check for Updates’ to begin the update process.
- Follow the prompts to complete installation.
- After installation, be sure to check your Stitching Defaults, in the Configuration Form.
- After installing new software, remember to import your Toolbar and Menubar Presets.
VIDEO | Windows Updates
What’s New in CS 7.5.4
The latest version of CreativeStudio is 7.5.4. Here is a list of what is new since 7.5.3.- Sync logic has been improved.
- Sync interface and messaging have been simplified.
- In the event that Sync totals do not match, Gammill is automatically notified about the issue so our team can investigate the cause.
- Project files will automatically be tested for errors during the save process.
- In the event an error occurs, the user will be notified to complete the project before exiting CreativeStudio.
Improvement
- PVM and iPattern imports are no longer restricted to 50 patterns.
- SAM computers will no longer receive the “Stitcher not Registered to Account” message.
- Splash Screen will now automatically close when a user clicks to learn more information.
CreativeStudio Download Files
Full Download
ONLY use the full download if you are installing on a computer that has never had any version of CS7 on it. To download the full version, click below, unzip the download and run the exe. DO NOT use the full download on any computer (machine or stand alone), that already has ANY version of CreativeStudio 7 installed.
Install Troubleshooting
While most people are having a smooth transition to CreativeStudio 7.5, there are a few users running into errors. Below are the common scenarios and their solutions. If these do not work for you please call tech support at 417-256-5919 and we can assist you further.
Message says "This stitcher is not registered to your account."
This message will always come up on a stand alone computer (one that’s not powering your Statler machine directly--such as a laptop, etc) because your SAM computer isn’t registered with Gammill. This is a known issue, please click OK to bypass the message and use the software normally.
Pattern Totals do not match when running PatternCloud Sync prior to updating:
Beginning with CreativeStudio 7.5, Fonts are no longer included in the pattern count totals. Any machine running a prior version of CS will have totals not match because of this update. Once your machine is updated to 7.5 the totals will match.
"Sentinel Driver" error message

Error 1500: “another install is in process”
If you encounter error 1500 which says “another install is in process” just wait 15 seconds and then click “Retry”.

Message says that Stitcher computer is not a Gammill computer
OR
Cascade of error messages (one after the other), generally on Windows 7 computers
- Go to “add/remove programs” and find galiltools in the list. Uninstall the program.
- Reboot the computer.
- Locate the installer file, you’ll find it thru Windows File Explorer. Go to This Computer > C Drive > StatlerStitcher > CreativeStudio7.0 and it is called “GalilTools-1.6.4.165-Win-x86.exe” Make sure to use the file ending with “x86.exe”, there may be another file there with a similar name.
- Double-click the file to install Galil Tools and step thru the prompts until installation is finished.
- Shut down the computer and then start it up again.
- Proceed with the normal installation of CreativeStudio
Error message says “Error in XML document”
This is seen if the Stitcher Definition file becomes damaged.
-
Navigate to the C drive, then go into the “StatlerStitcher” folder, and then into the “CreativeStudio7.0” folder.
-
Find the file called “StitcherDef.defxml” and delete it.
-
Replace it (in the same folder) with an undamaged copy of the file, click HERE to download.
-
Rename the “StitcherDef.txt” file that you just downloaded, to “StitcherDef.defxml” and approve the warning message that tells you that renaming file extensions is a bad idea.
-
Reboot your computer.
-
Start up CreativeStudio
-
Go to Tools > Technical Support > Reset CS Configuration and choose the correct Controller type to match your system. The software will prompt you thru a couple steps.
If during installation, any errors or messages pop up, do what they tell you to do and then again close and restart CS. If any additional errors or messages pop up, do what they tell you to do and then again close and restart CS. When you are able to start CS and it immediately says “connected” with a green dot at the lower left corner of the screen, your install has been completed successfully.
