CreativeStudio 7.5.4 (SAM) Installation Instructions
Please follow these steps carefully to ensure successful installation.
Following these instructions and avoiding common installation mistakes, you can successfully set up SAM (Stand Alone Mode) on your Windows 10 or Windows 11 computer. If you encounter any issues, please contact our support team for assistance.
Things to do first before installing:
1. Windows Updates
- Verify you have done all Windows updates on the computer, if there are updates, please install them before you proceed with the installation.

2. Disable Antivirus Software
- Prior to running the installation file, temporarily disable or uninstall any third-party antivirus software (e.g., McAfee, AVG, Norton, MalwareBytes, etc.) running on your computer.
Note: Windows Defender is okay to leave running.
- Ensure the antivirus software is completely deactivated. Check your system tray icons in the taskbar and use the "Task Manager" (Ctrl+Alt+Del, then "Task Manager") to ensure no antivirus processes are active.
- Disable the antivirus software during the installation process to prevent any conflicts. If you need to reboot at any point, make sure the antivirus hasn’t reactivated itself.
3. Microsoft Windows S Mode
If your computer has S Mode enabled, it must be disabled before you can install CreativeStudio. How to switch out of Windows 11 S Mode | PCWorld
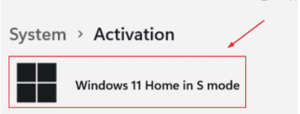
NOTE: Do not Install directly from the Zipped Download File or from a USB drive

How to install correctly:
1. Go to Gammill.com, log into your owner portal account, and click this link:
CreativeStudio 7 | Gammill, Inc
2. To unzip the downloaded ZIP file. Right-click on the ZIP folder and select "Extract All."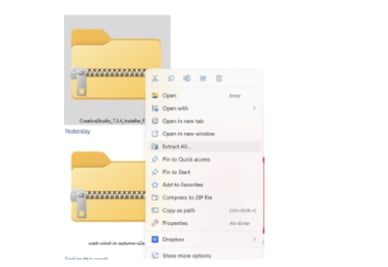
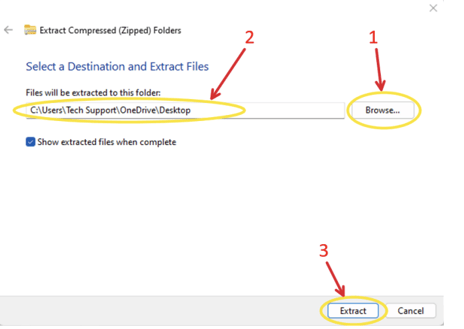
3. Select Browse (#1 in image), then select where you would like to save the extracted folder (#2 in image). Usually, a good place is the desktop. Then select Extract (#3 in image).
NOTE: Once the folder has been extracted, please move the ZIP folder to the Recycle Bin
Microsoft SQL Server Installation
1. Before starting the installation, create a new folder on the root drive (usually C:/) by opening the file explorer, and clicking on the OS (C:) of your computer to use when setting up the Microsoft SQL Server.
NOTE: Your root drive may be labeled differently.
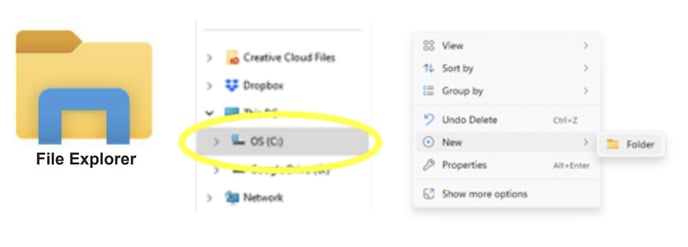
2. Label the folder you created SQL CS Database so that you can find it later in the installation process.

CreativeStudio Installation Process
1. Double-click on the unzipped folder.
2. Right-click on the installation file. ![]()
3. Click Run as administrator, and select Yes on the popup. 
4. Follow the installation prompts. At each step of the installer, there will be a moment when the button lights up to advance to the next step. Each time a button lights up so you can advance, please wait an additional 30 seconds before clicking that button.
5. About midway through the installation, a small window will pop up, prompting you to install Microsoft SQL Server 2014 Express RTM (x86 & x64Wow). Select Install.

6. You will see this screen to select a directory location to install SQL. Select browse, then select the SQL CS Database folder we made earlier and click OK.
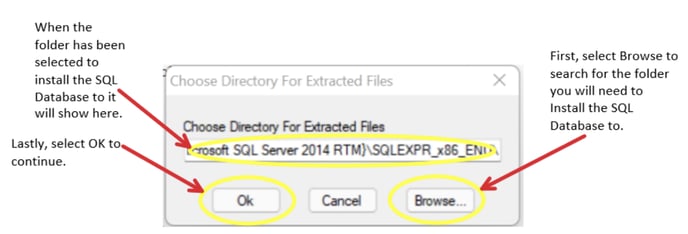
7. Finish the installation.
How to Correct a Failed CS7 Installation on Your SAM Computer:
*If you've encountered a failed installation of CreativeStudio 7 (CS7) on your SAM computer, it's likely due to one of the three common installation mistakes outlined in the provided instructions. Before you attempt the installation again, you'll need to clean up your computer from the previous failed installation.
Follow these steps to resolve the issue:
1. Access the "Add/Remove Programs" Dialog:
- Open the "Add/Remove Programs" or "Programs and Features" dialog on your computer.
- Click on the "Sort By" option and change it to "Date Installed."
2. Identify CS7 and Associated Programs:
- Locate "CreativeStudio 7.x" in the list of installed programs.
- Note the installation date of CreativeStudio. 3. Uninstall CreativeStudio and Related Programs:
3. Uninstall CreativeStudio and Related Programs:
- Uninstall "CreativeStudio 7.x."
- Check if any of the following programs were installed on the same date as the failed CreativeStudio installation: GalilTools, Microsoft System CLR Types (any/all versions), Microsoft SQL Server 2014, Microsoft ODBC Driver 11 for SQL Server, Microsoft Report Viewer 2015 Runtime, Microsoft SQL Server 2008 Setup Support Files, Microsoft SQL Server 2012 Native Client, Microsoft SQL Server 2014 Setup (English), Microsoft SQL Server 2014 Transact-SQL ScriptDom, Microsoft Visual C++ Redistributable (any/all versions), Microsoft VSS Writer for SQL Server 2014 l. Sentinel Protection Installer (any version), SQL Server Browser for SQL Server 2014
- Uninstall any/all of the listed programs above that were installed on the same date as the failed CreativeStudio installation.
4. Reboot Your Computer:
- Restart your computer to ensure that the changes take effect.
5. Confirm Successful Removal:
- Open the "Add/Remove Programs" dialog again to verify that all the related programs from Step 3 have been successfully removed. If any are still present, uninstall them and reboot your computer once more.
6. Delete StatlerStitcher Folder:
- Open File Explorer and navigate to the C Drive.
- Locate the "StatlerStitcher" folder and delete it along with all its contents. You might receive a warning message; proceed with the deletion.
7. Successful Cleanup:
- Congratulations, the failed installation has been effectively cleaned up.
8. Refer to Installation Instructions:
- To ensure a successful installation of CreativeStudio, please refer to the provided instructions for "Installing CreativeStudio for SAM." These instructions will help you avoid the three most common mistakes made during the installation process
