
VIDEO | Draw Text
Draw Text allows a string of letters to be stitched. The text needs to be positioned on the quilt, and this can be done by identifying a boundary, a reference point (chosen on quilt or on CAD), or a pattern path (similar to the Apply Pattern feature). The path pattern is needed for placement, but can be removed before stitching if desired. If using a path pattern, place it on screen at the correct location and size before starting the text setup.
How to Draw Text
Initiate Draw Text by using one of the following:
- Click on the Draw Pattern icon.
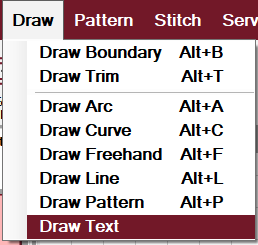
- Click on the word Draw on the command bar, then choose Draw Text.
- Right-click an open area on the CAD, and choose Draw Text.
 |
 |
Unlike other Draw features, Draw Text will open a setup on the right side of the screen. Various options are available in this setup window.
- Identify the start point of your text by clicking a point on the CAD, clicking a boundary you want to place the text within, or clicking on a path pattern on the CAD to select it.
- Using the setup box, type the text in the Enter Text box. You may have to click in the box to see the cursor before typing.
- Make any changes desired to the settings in the Text setup window. Changes are dynamic, so you can watch the changes appear on screen until you are satisfied with the result.
- Once text appears on screen, you can move it simply by clicking a new location, boundary or path pattern on screen. This is true until you close the Text setup window.
- Exit Draw Text by clicking OK, Again or Cancel.
- OK will save your setup and close the setup window
- Again will save your setup on the CAD and allow you to place a second Text setup simply by choosing a new point on CAD and new parameters in the setup window
- Cancel will remove the text on the CAD and close the setup window
After exiting the drawing, you can adjust the text as you would any pattern set.

Text Types |
|
|
Cursive Text The Statler font is the cursive selection that provides continuous stitching of a word. Notice there are only jump stitches between words. |
 |
|
Block Text Block text provides multiple font options but will have multiple jump stitches as the letters do not connect to each other. Not all block fonts make good stitchable patterns. |
 |
Draw Text Examples |
|
|
To place text in a boundary, draw the boundary prior to selecting Draw Text, then click the boundary. |
 |
|
To place a pattern along a path, draw the path prior to Draw Text. In this example, we used Draw Arc to place an arc pattern and then selected the arc to place the text along it. After exiting Draw Text, the path pattern can be deleted. |
 |
|
Select Fill Path to repeat the pattern at the designated text height to fill the space. |
 |
|
Select Top, Middle or Bottom under Orientation to change where the text appears in orientation to the path pattern. |
 |