
Onboard Bobbin Winder Parts

Onboard Bobbin Winder Instructions 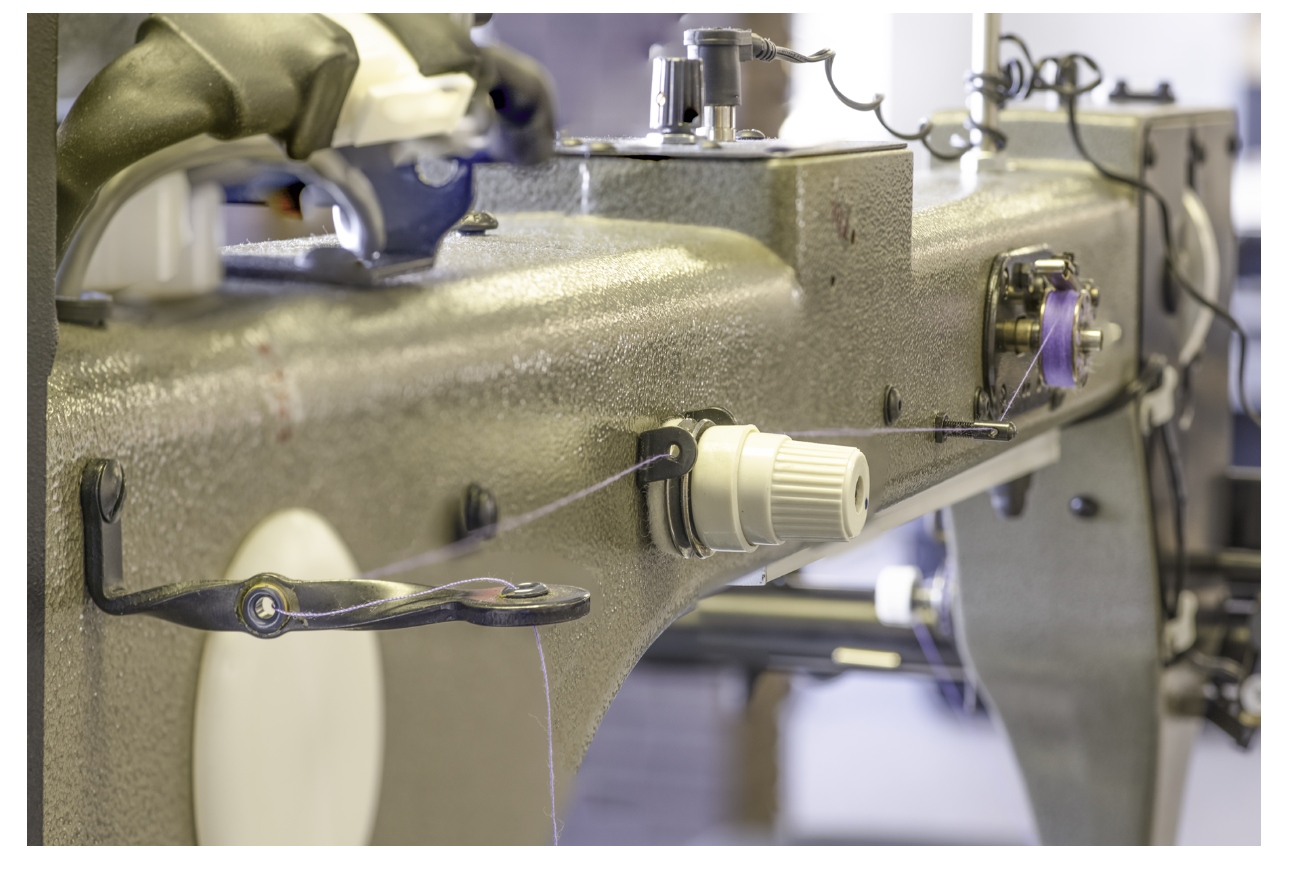
1. Place the cone on the cone holder. The cone holder should be adjusted so the top of the cone is directly under the first thread guide.
2. The thread guide consists of two holes. Bring the thread from bottom to top then from back to front of this thread guide.
3. Next bring the thread to the thread guide just before the tension device and go counterclockwise ½ turn around the discs of the tension device. Be sure the thread is securely between the two discs.
4. Next bring the thread to the thread guide just after the tension device then to the thread post just before the bobbin winder.
5. Lift the lever and place the bobbin on the winder. There is a notch on the bobbin. After sliding on the bobbin, turn it until it clicks into the lever wire into the notch.
6. Take your thread over the bobbin and while holding the tail of the thread, pull the thread from the cone to wrap it around the bobbin counterclockwise about 8 times.
7. Lower the lever and pick-up lever 1/4” so that bobbin thread will wind evenly. The bobbin will now wind each time the motor is turned on. When the bobbin is full, the lever will release and the bobbin will stop winding.
If the bobbin is unevenly filled, realign the thread guide spindle by loosening the locking nut and screwing the spindle outward or inward to align the spindle hole with the center of the bobbin. Also, make sure there is a moderate tension on the winding thread. If the tension device is too tight then the thread will “push” out of discs and the bobbin will wind loose.
Maintenance and Repair of Onboard Bobbin Winder
To replace a worn rubber O-Ring, remove the four screws which hold the bobbin winder to the casting. This will allow the removal of the entire unit to gain access to the rubber O-Ring.
If the bobbin winder driving disk does not make contact with the O-Ring when the winder is engaged, this may indicate the driving disk needs to be moved closer to the O-Ring. To make this adjustment, locate and remove the rubber plug on top of the upper arm that aligns with the winder.
Using an Allen wrench, loosen the two screws on the driving disk and with the bobbin winder lever engaged, slide the disk until it makes gentle contact with the O-Ring and tighten both screws.
Note: Hold the bobbin winder spindle with one hand. Turn the handwheel with the other. If you can hold the spindle, the driving disk needs to be closer.
Tip: If the bobbin winds with less thread in the middle of the bobbin, the O-Ring is adjusted too tight to the disc.
Video | O'Ring Replacement
Occasionally, the thread can become wrapped around the bobbin winder shaft, causing undue pressure. To remove the excess thread from the shaft, follow these easy steps.
- Remove the Bobbin Winder assembly from the machine by removing the four mounting screws.
- Place the lever arm down against the shaft in the engaged position to allow the shaft to turn freely.
- Loosen the set screw on the drive wheel and remove the drive wheel from the shaft. Note that the set screw is located at a flat spot on the shaft.
-
Remove the shaft from the Bobbin winder assembly and remove the thread from the shaft.
- Return the shaft into the assembly and install the wheel ensuring the setscrew is aligned with the flat spot on the shaft.
- Tighten the setscrew of the drive wheel taking care to position the wheel close to the bushing, but without pressure. Note: Applying too much pressure on the wheel against the bushing can result in excessive heat, wear, and binding of the machine while winding a bobbin.
- Check to ensure free rotation of the wheel and shaft.
- Reinstall the bobbin winder in its mount with the four mounting screws.
- Place a drop of oil in the oil port in the bushing of the bobbin winder.
- Disc Drive Adjustment
OB Bobbin Winder Replacement