
Wind perfect bobbins each time. With a sleek and compact design, the Professional Bobbin Winder quietly and quickly winds consistent bobbins. The winder features an automatic shut-off, thread cutter, speed, and tension controls.
Assembling the Bobbin Winder 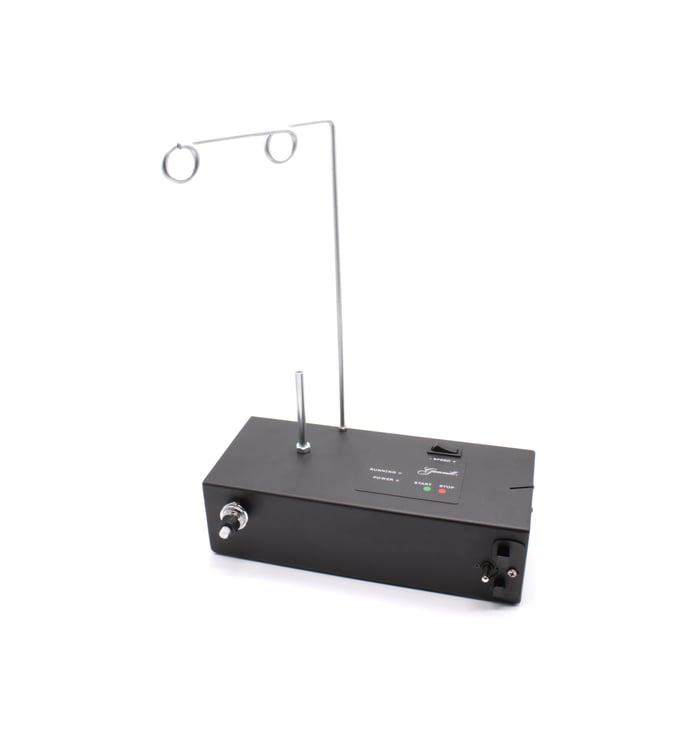
The Professional Bobbin Winder comes with a thread guide post and a thread cone post. There are two screw holes on the top of the bobbin winder. The thread guide post will need to be screwed into the hole near the back and the thread cone post will need to be screwed into the hole near the middle. Next will need to unwrap the power cord and plug into the outlet on the left side of the bobbin winder. Once the power cord is plugged into the bobbin winder and an electrical outlet, you can use the main power switch just above the power cord to turn on the bobbin winder.
Using the Professional Bobbin Winder
Next, you will need to place the cone of thread of your choice on the thread cone post and refer to the following picture for the correct thread path.
Now, it’s time to wind bobbins! First, slide the thread through one of the holes in an empty bobbin from the inside toward the outside. Next, while holding the thread, place the empty bobbin on the motor spindle and push all the way on.
Simply choose your preferred winding speed using the speed control switch. Then, press the green start button. Once the bobbin is full, the optical sensors with detect this and the motor will shut-off. If you should need to stop the winder before automatic shut-off, you can press the red stop button. The open slot on the right side of the bobbin winder contains a thread cutter to allow you to remove the bobbin, cut the thread and get right back to quilting!
Adjusting the Professional Bobbin Winder
|
To adjust the tension of the Professional Bobbin Winder, turn the black knob clockwise to increase tension or counter-clockwise to decrease tension. You can use the silver knob to adjust the centering of the thread on the bobbin. |
 |
|
To adjust the amount of bobbin fill, slightly loosen the screw to the right of the bobbin spindle. Then, slide the optical sensor to the right to increase bobbin fill, or to the left to decrease bobbin fill. Be sure to re-tighten the screw when you are finished adjusting the sensor location. |
 |
|
When the thread cutter becomes dull, the blade can be adjusted to provide a fresh, sharp cutting surface. Using a 2mm allen wrench, loosen the two screws holding the cutting blade. Do NOT completely remove the screws! Slide the blade either to the left or the right. Re-tighten the screws to hold the blade firmly in place. |
 |