
|
Rotary Checks Spring Assembly The rotary check spring device consists of a thread post, a wheel with an adjustment knob, a check spring, and finally another post. The thread is placed over the first post, wrapped around the wheel, over the check spring, and under the second post. The assembly should be adjusted so that, as the thread is pulled from the needle, the wheel turns. Turning the knob will not adjust the tension. Caution: Be careful the thread does not come out of the wheel’s shallow groove. |

|
Replacing the Rotary Check Spring
The Rotary Check spring Assembly is pulled and released each time a stitch is made. This repetitive movement causes the thin material to fatigue and break over time. It is a good idea to have two spare check springs on hand. Check springs are easy to replace and it is not necessary to disassemble the entire device to replace it. 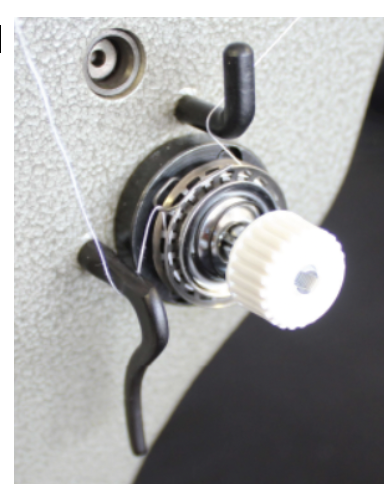
Using a 1/16 Allen wrench, loosen the small set screw located in the edge of the black tension ring at approximately the 3:30 position.
Remove the entire assembly from the ring and locate the set screw at the backside of the housing that holds the tension shaft in the housing. Loosening this set screw allows the removal of the shaft and the broken check spring.
Replace the check spring by threading the end of the new check spring through the slot in the housing and forcing the coil portion of the check spring back into the housing. Install the tension shaft back into the center of the coils spring and rotate until a part of check spring fits into the groove in the tension shaft. When this is done, the arm of the check spring will move as the shaft is rocked back and forth. The proper adjustment of spring strength is achieved by rotating the shaft clockwise until the arm of the spring rests against the right side of the slot (or notch), then continue to rotate the shaft clockwise until the spring passes three spokes on the side of the rotary wheel or 1/6th of a revolution, which adds the proper strength to the check spring.
Tighten the shaft set screw on the housing and install the housing back into the black ring. Set the radial position of the tension so the bottom of the hoop of the check spring is at 10:30 o’clock (halfway between 9:00 and 12:00).
Caution: do not push the housing so far into the ring as to cause the check spring’s arm to touch the black ring.
Tighten the Allen set screw. The proper adjustment of regular tension is usually with the thumb nut even with the end of the tension shaft.
Note: Many times after a thread break, the thread will wrap itself around the check spring. Prior to re-threading the machine after a thread break, check that the thread is not wound around this check spring
Video | Troubleshooting Tension