
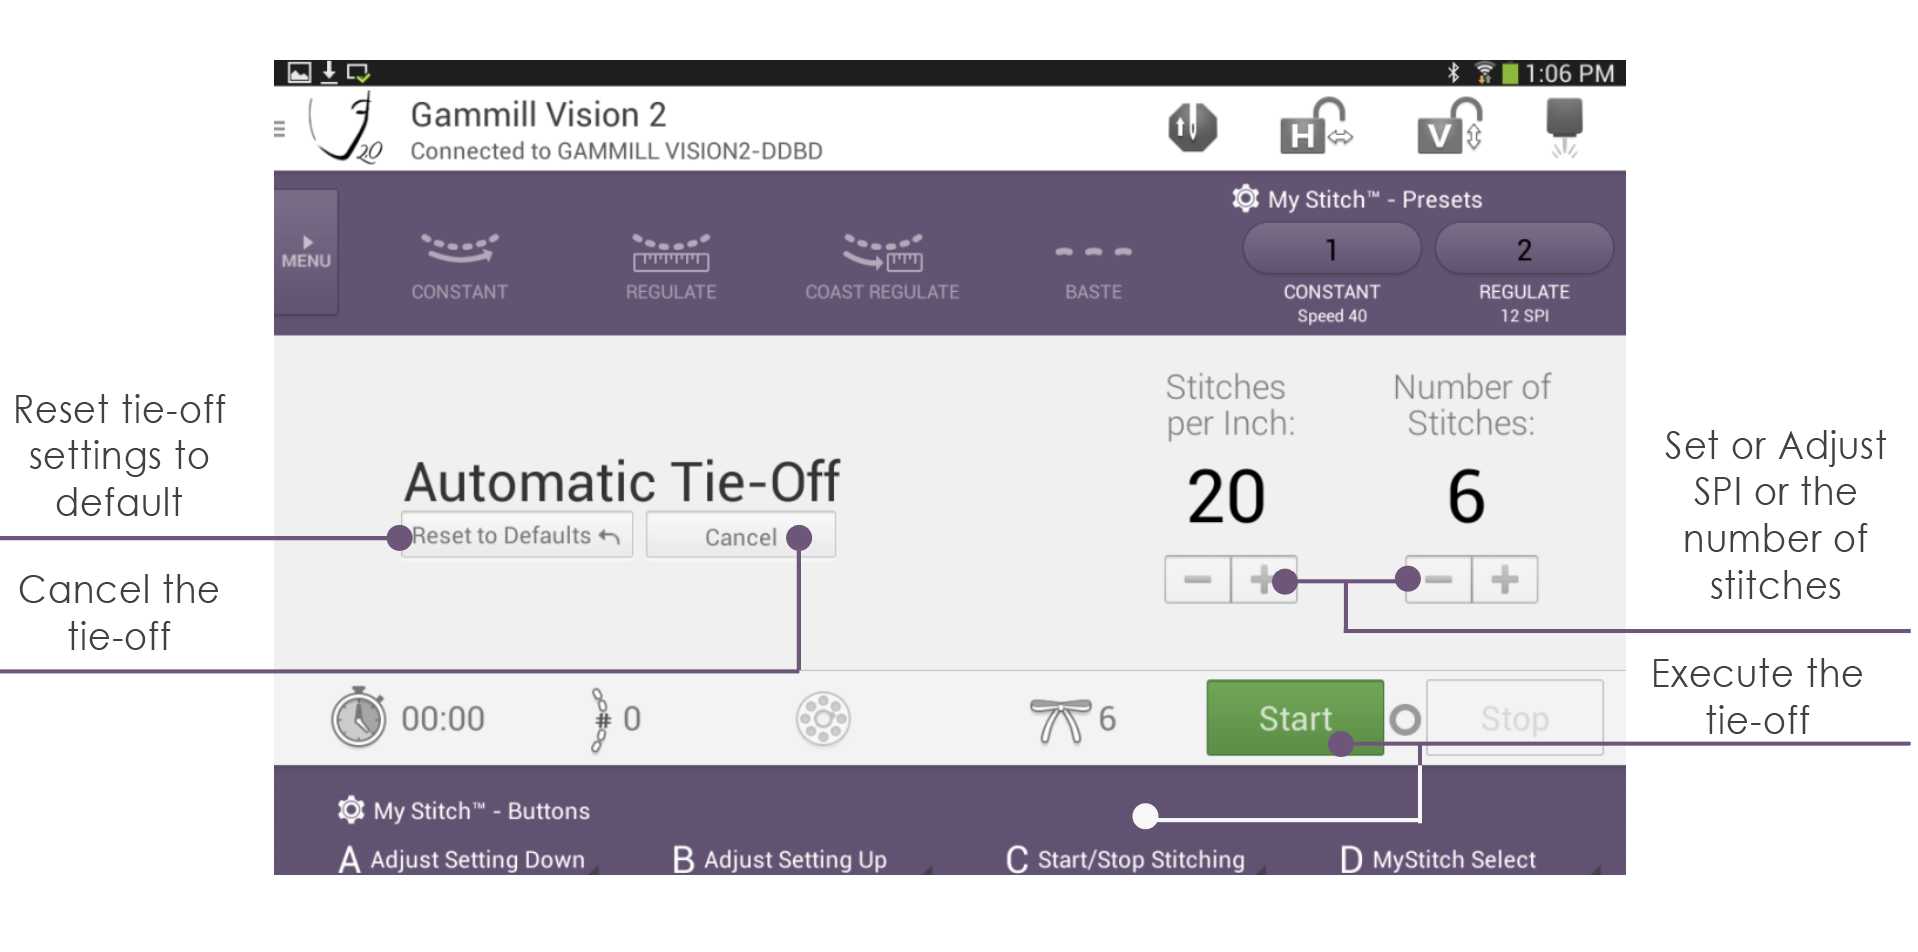
Automatic Tie-Off Function
Secure stitching with the Automatic Tie-Off function that delivers a set number of stitches at a preselected density.
Touch the tied bow icon to access the tie-off mode. Notice the stitching mode changes to Automatic Tie-Off in the mode section in the middle of the screen and the tied bow indicates the number of stitches left in the tie-off.

To set the Automatic Tie-Off:
Touch the plus or minus sign below “Stitches per Inch” to adjust the stitch length. The Stitches per Inch may be adjusted from 12 to 60.
Touch the plus or minus sign below “Number of Stitches” to adjust the number of stitches used in the tie-off. The Number of Stitches may be adjusted from 2 to 15.
To reset the defaults for the Automatic Tie-Off:
Touch the Reset to Defaults button located under the Automatic Tie-Off label in the center of the screen.
Notice the Stitches per Inch and Number of Stitches settings return to their original settings.
To cancel the Automatic Tie-Off:
Touch the Cancel button located under the Automatic Tie-Off label in the center of the screen.
Or touch the tied bow icon again to cancel.
Notice the screen changes back to the mode and settings selected prior to entering the Automatic Tie-Off function.
To execute an Automatic Tie-Off
Touch the Start button on the screen or press the handle button set to start/ stop stitching. Move the head.
Notice the machine begins stitching as soon as the head moves. The number beside the tied bow also counts down as the stitches are delivered.
If the red stop button is pressed during a tie-off, the current tie-off will stop but will not leave the tie-off mode. If the green start button is pushed again, the tie-off will start over rather than picking up where stopped.
When the Automatic Tie-Off function is complete, the screen will change to show it is complete briefly and then change back to a Completed screen.
Stitch Timer Function
The Stitch Timer function continually monitors the amount of time spent stitching making it easy to keep track of the time spent on a project.
To reset the Stitch Timer:
Touch the Stitch Timer icon.
Notice a window appears asking if you are sure you want to reset the Stitch Timer.
Touch the Reset the Timer button to reset the time. Or select cancel to cancel the action.

Notice the timer display resets to 00:00. The time is displayed in an HH:MM:SS format where HH is the number of hours, MM is the number of minutes, and SS is the number of seconds. If the timer exceeds 99:59:59, the timer will automatically reset to 00:00.

Stitch Counter Function
The Stitch Counter continually counts the number of stitches taken making it easy to track the number of stitches in a project.
To reset the Stitch Counter:
Touch the Stitch Timer icon.
Notice a window appears asking if you are sure you want to reset the Stitch Timer.
Tap the Reset the Counter button to reset the count and the counter will return to zero. Tap cancel to cancel resetting the Stitch Counter.
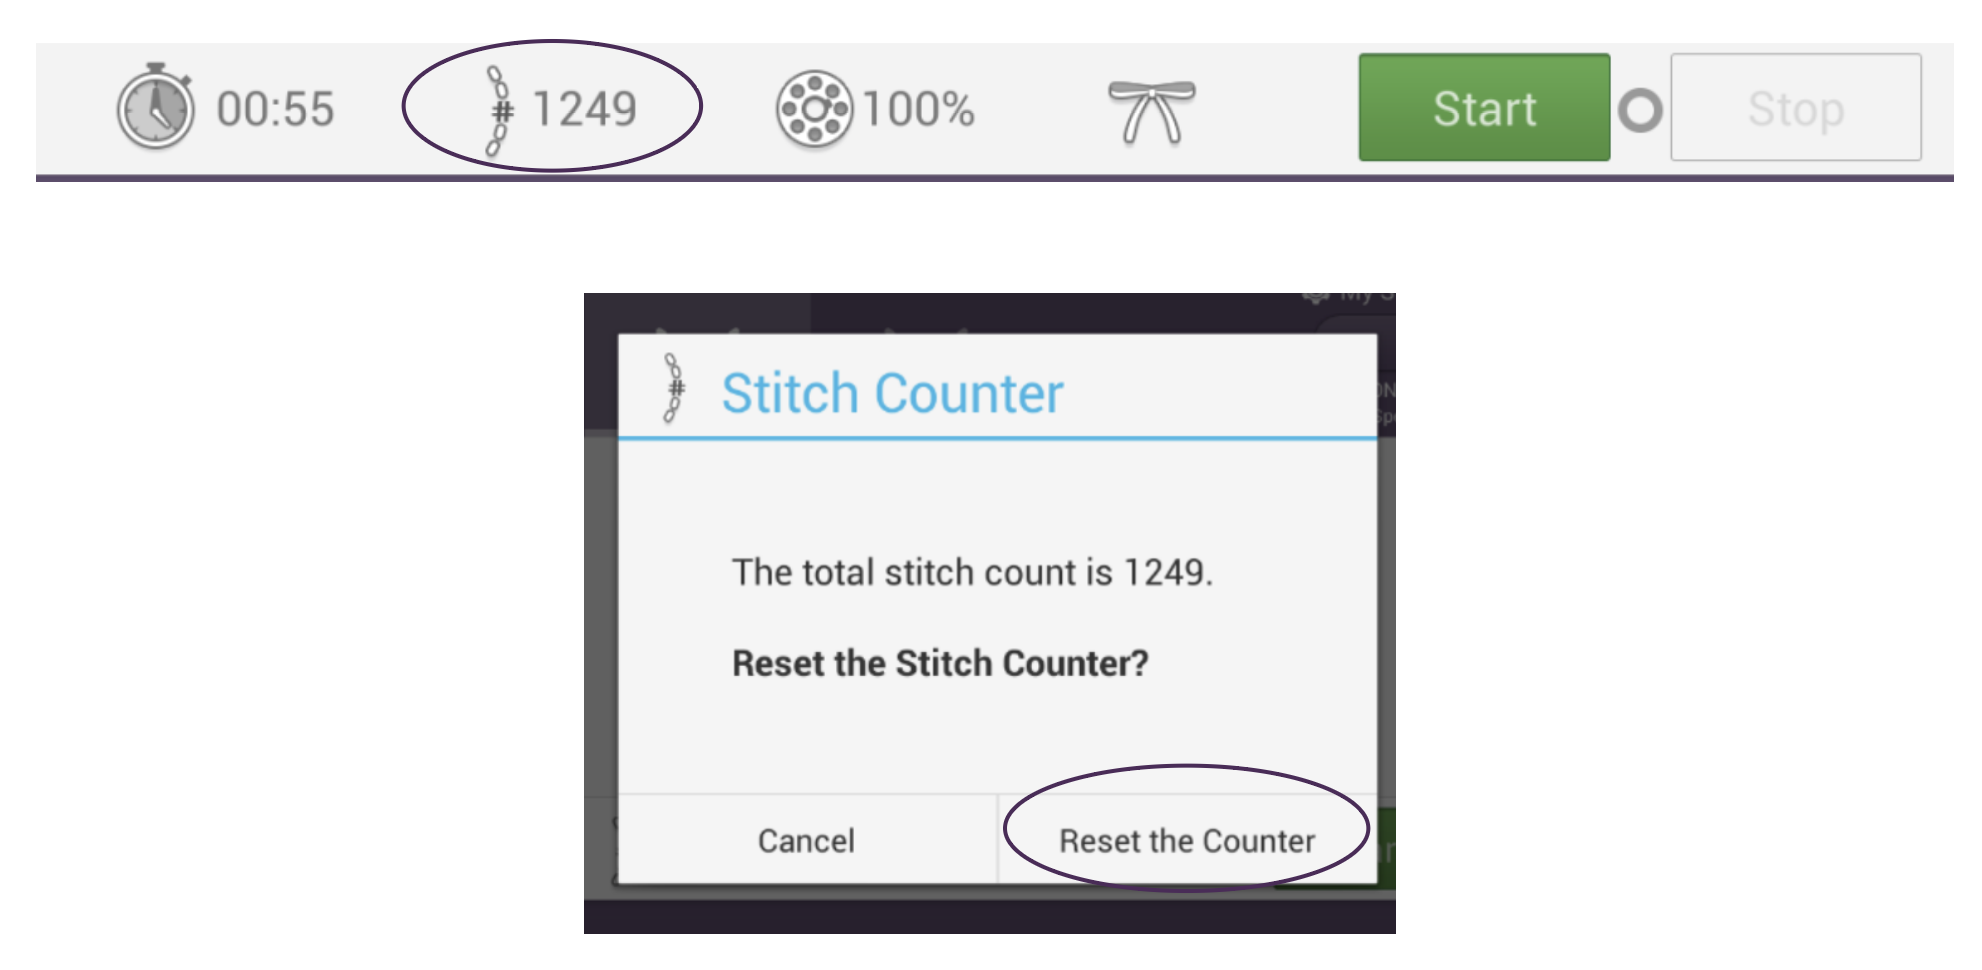
This indicator displays the number of stitches taken, with a maximum of 999,999 allowed. At this point, the indicator will automatically reset to 0.
Bobbin Gauge Function
The Bobbin Gauge function monitors the amount of top thread used to estimate usage of the bobbin thread displaying a percentage of the amount of the bobbin thread remaining.
To use the Bobbin Gauge:
Tap the Bobbin Gauge icon.
Notice the Bobbin Gauge settings window appears.
Tap the box beside the “Use the Bobbin Gauge” message.
Notice a checkmark appears indicating the Bobbin Gauge is active.
To set the Thread Factor:
Touch the plus or minus sign to adjust the Thread Factor up or down. The Thread Factor may be adjusted from 1 to 10.
Set the Thread Factor higher for thinner threads.
Set the Thread Factor lower for thicker threads.
Tap the OK button.
The Thread Factor is a value helps determine the bobbin thread usage. The best way to think of the Factor is to relate it to the thickness of the bobbin thread. The thicker the bobbin thread, the less thread will fit on a bobbin. Use a lower number when using thicker thread. Adjust the Bobbin Factor and observe when the alarm occurs versus the actual amount of thread left on your bobbins. Make adjustments based on this feedback until you obtain the desired results.
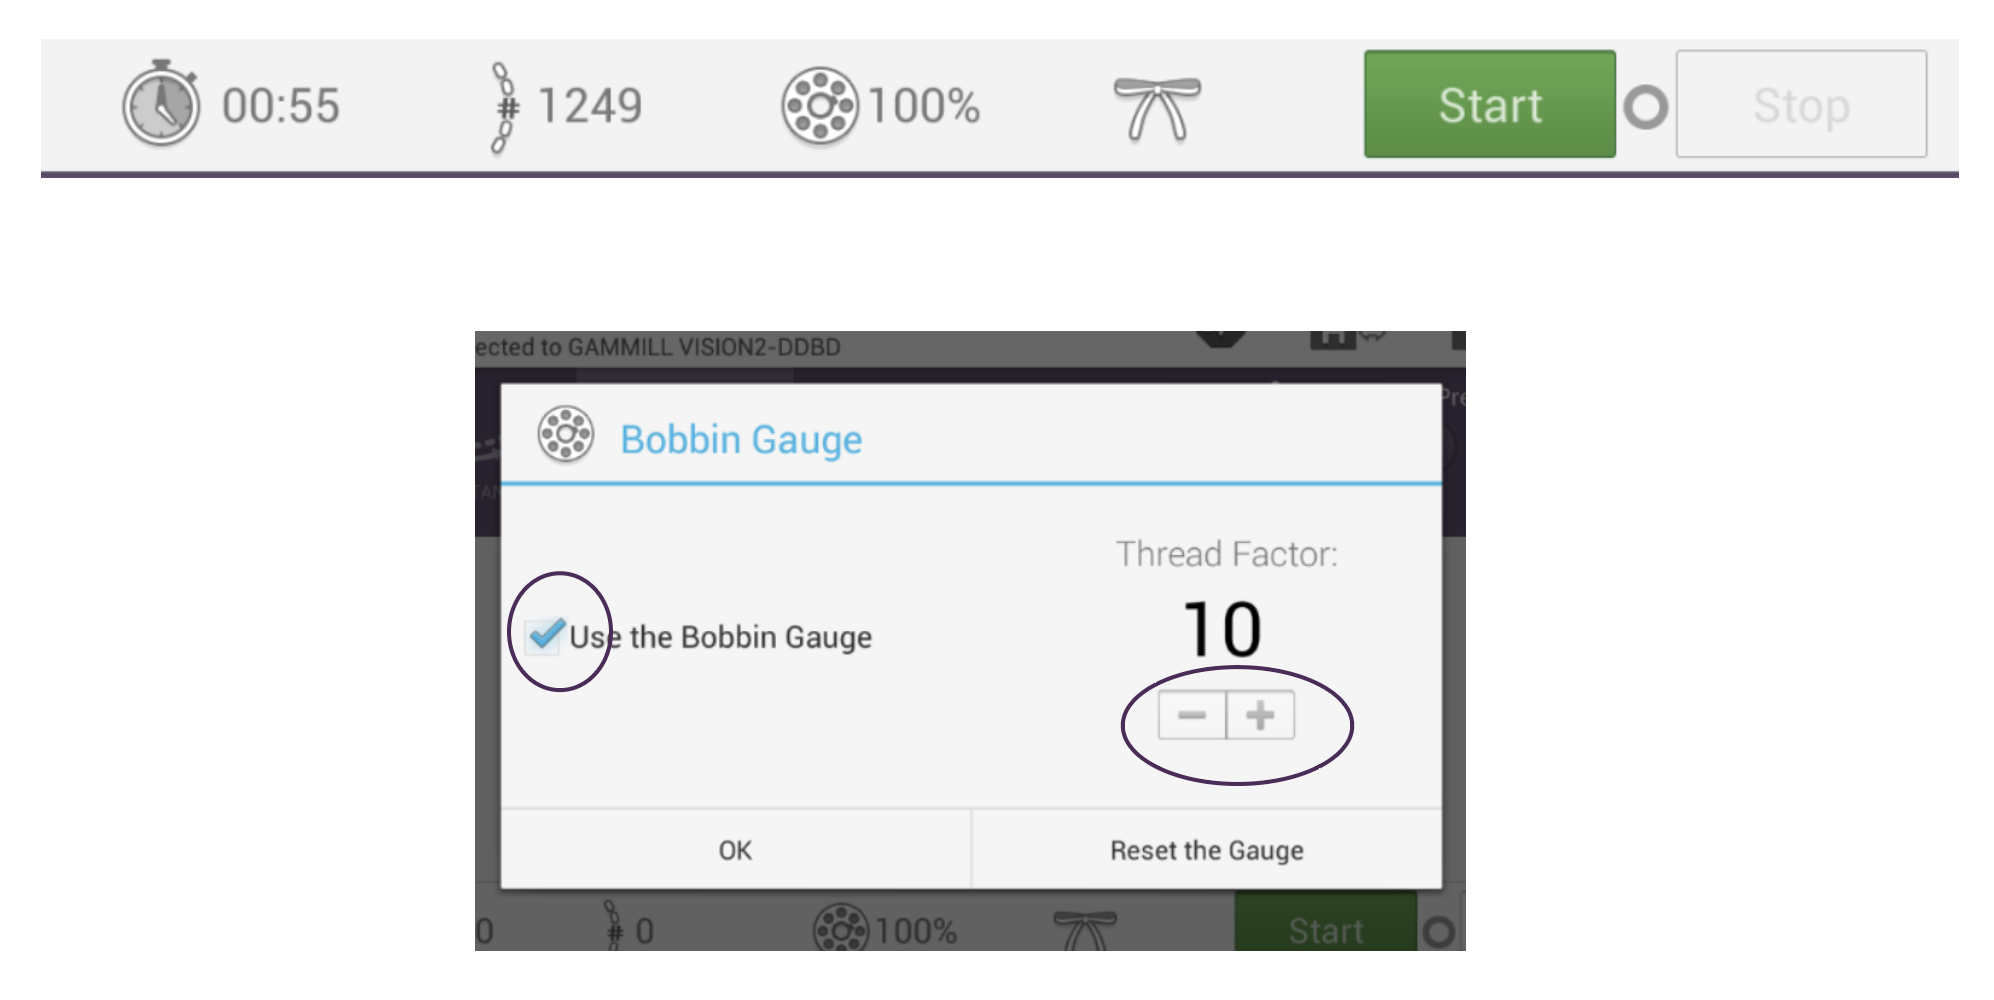
To reset the Bobbin Gauge:
Tap the Reset the Gauge button.
Notice the Bobbin Gauge on the main screen is reset to 100%
To disable the Bobbin Gauge:
Tap the checked box beside the “Use the Bobbin Gauge” message.
Notice the check mark disappears indicating the Bobbin Gauge is now inactive.
Touch the OK button.
Notice the window closes and the Bobbin Gauge icon is grayed out on the main screen and no percentage is shown.
As you stitch, the bobbin gauge percentage will decrease. When the percentage reaches 10%, the system will issue an alert to warn you that the bobbin is almost empty.

Since it is not possible to directly measure the amount of bobbin thread remaining, the system must use the usage of the top thread to gauge the use of the bobbin thread. The system assumes some things such as tension, bobbin capacity, and how full the bobbin is filled to, but proper estimation of the remaining bobbin thread still relies on input from the operator.
The bobbin Gauge may be used, but only the alert disabled. See the section on the Alert screen for additional information on this capability.