VIDEO | Technical Support
The Service menu lists the options for setting user preferences, testing and performing diagnostics, and technical troubleshooting resources.

The User Settable Controller Definitions are outlined below. All other options under Technical Support are used for testing or diagnostic purposes and should only be utilized at the instruction of a Gammill Technician or Technical Support personnel.
Controller Definitions
The Controller Definition form contains the user settable preferences. These settings contain 'factory defaults' when CreativeStudio is first installed, but can be changed at any time.
Every quilter develops stitch setting and system preferences over time. These preferences can be set and saved as system defaults, but each setting can still be changed at any time to reflect what is best for a particular project or CreativeStudio session.
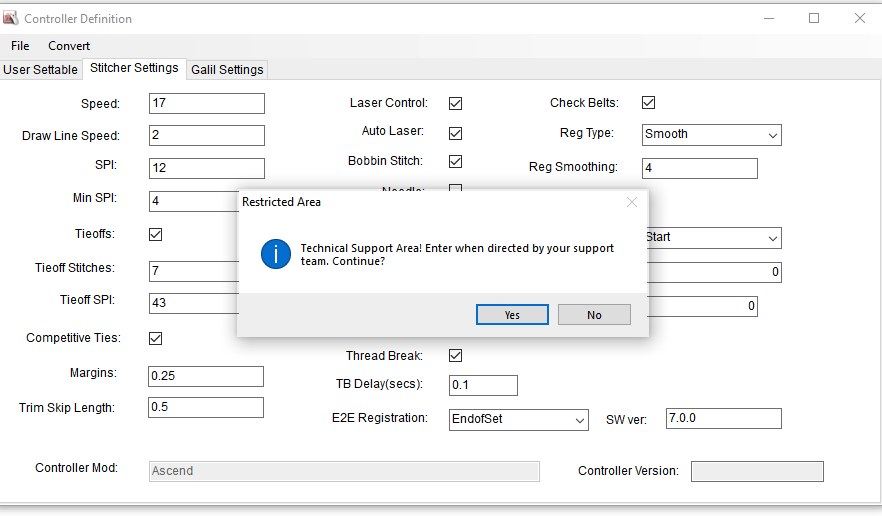
Access User Settable Controller Definitions under Service > Technical Support > Controller Definition. There are three tabs on the Controller Definition form. Only first tab (User Settable) should be altered. Attempting to open either of the other two tabs (Stitcher Settings and Galil Settings) will result in a popup warning. Only enter these areas if instructed by Gammill Support.

User Settable Controller Definitions
User settable definitions are one way to customize the settings of CreativeStudio to your preferences. The form is initially set with default settings from Gammill but each setting can be changed at any time. Many of the settings found in this form can also be changed instantly in other areas of CreativeStudio.

- Speed -- Stitching speed is set to a number on the scale of 1 to 20. The default is set to 13, because that seems to be an optimum balance between pace and stitch quality.
- Draw Line Speed -- This speed is also a number on the scale of 1 to 20, but the default is 2, and it applies only to patterns created with the Draw Line feature. Draw Line is commonly used for Stitch in the Ditch (SID). The slower stitching speed facilitates greater accuracy in ditch work.
- SPI -- Stitches Per Inch is the stitch length. Default size is 12 SPI, but stitch length preference can be as set to anywhere between 4 to 20 stitches per inch.
- Min SPI -- This is the minimum stitches per inch (aka the largest stitches) allowed for patterns.
- Tieoffs -- By definition, tieoffs are tiny stitches at the beginning and ending of stitching intended to lock the thread ends and prevent the line of stitching from coming loose. If this setting is checked, CS will do tieoff stitches (standard or competitive).
- Tieoff Stitches -- This is the number of tieoff stitches requested, at both the beginning and the end of a line of stitching.
- Tieoff SPI -- This applies to competitive ties only. It is the stitch length used when doing a competitive tieoff.
- Competitive Ties -- By definition, competitive tie are made by taking tiny stitches, all in the forward direction, along the pattern path. Standard tieoffs are made by taking one stitch forward and one back, in place, making a little knot. If this setting is checked, CS will do competitive tieoffs instead of a standard tieoffs. The length of the competitive tieoff is calculated using the Tieoff Stitches (default 7) times the Tieoff SPI (default 43). For example, CS takes 7 stitches at 43 spi, for a total length of just under 1/6 of an inch.
- Margins -- This is the amount of space allowed between a pattern and the boundary. In a perfect world this would be exact, but in reality it is a target; not all patterns can fit into a boundary and maintain a margin in all directions.
- Trim Skip Length -- This is a setting that applies to the Draw Trim process. When a pattern is trimmed to fit around an object, small pieces (smaller than this setting size) are skipped. It is assumed that these pattern segments would not detract from the design if they were missing, especially since a portion of the segment would be tieoffs.
- Controller Mod - This is the model letter/number of the controller that controls the stitching process.
- Laser Control -- This setting means the quilter can control the laser.
- Auto laser -- This means CS will turn the laser on/off automatically, depending on the feature.
- Bobbin Stitch -- This is the first stitch taken after the stitcher moves to the start of the pattern about to be quilted. If this is checked, CS will take the stitch and pause, waiting for the bobbin thread to be pulled up and the 'Continue' button to be pressed. If this is unchecked, there is no pause.
- Needle -- If this is checked, the needle is 'on' and will stitch. If this is unchecked, the stitcher will move along the path of the pattern but it will not stitch.
- Stitch Points -- This is a setting that takes an extra stitch in every point of a design. The result is sharp, well defined points, but it does slow down the stitching somewhat.
- Stop at Jump Stitch -- By definition, a Jump Stitch is a break in the pattern. It might be large or small, but the two pattern sections are not snapped together. If this is checked, CS will pause, waiting for a 'Continue' response, similar to the Bobbin Stitch. If not checked, CS will take tieoff stitches (if the settings indicate they should) and continue without stopping.
- Auto Toggle as Unsewn -- If this setting is on, any thread break detected will automatically change the Sewn Status for the patterns just stitched.
- Thread Break -- When this is checked, the thread break sensor is on and the machine will stop if a thread break is detected. The thread break sensor is part of the top thread path. The thread wraps around it and as the machine stitches, the sensor turns. If it stops turning for a few seconds, the machine assumes the thread has broken and will stop stitching.
- TB Delay (secs) -- This setting adjusts the sensitivity of the thread break sensor. Small numbers make it very sensitive and faster to respond.
- E2E Registration -- This sets the default Roll Quilt Method for E2E mode. It determines how the machine will prompt for registration points after the quilt has been rolled. There are 3 options to choose from (EndOfSet, PlaceTwoPins, UseStartPointandEndPoint).
- Check Belts -- Many features depend on clicking points with the machine head. When two consecutive click points are identical, CS will issue a warning, asking if the belts have become detached.
- Reg Type -- This refers to the stitch regulation method. The three choices (Original, Smooth and Plus) each handle just a little differently.
- Reg Smoothing -- This also refers to the stitch regulation, particularly how curves are stitched. This setting changes the smoothing algorithm slightly, when the machine moves fast.
- Reference Point -- This is used when placing patterns using Repeat Patterns. The default is set here, but can be changed at the time the Repeat Pattern Feature is used. This is the normally preferred method (Upper Left, Upper Right, Lower Right, Lower Left, Start, End, Center).
- Total Stitch Count -- This is a running count of the number of stitches taken since the software was installed.
- Sew Overlap (inches) -- Sometimes block patterns (where the start point and the end point are the same) look better if the start and end stitches overlap eliminating the gap that can be caused by the hopping foot pushing the fabric. This setting will allow you to set your preferred length of overlap.
- SW Ver -- The current major software version category.
- Controller Version -- This is the version of software currently running the controller. This field will be empty on stand alone computers.
Making Changes to Controller Definitions
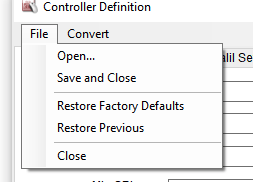
Once changes are made to the user settable Controller Definitions, you can click File then Save and Close to activate the settings. You can also Restore Previous settings or Restore Factory Defaults.
Stitcher Settings and Galil Settings
Stitcher Settings and Galil Settings should only be accessed when directed by a Gammill Technician or Technical Support Team Member. If you attempt to open one of these tabs, you will receive a warning message.