
Article Contents
Registration Points Introduction
Edge to Edge Quick Start
This article explains how to set up a quilt using Edge to Edge mode and complete the stitching using the End of Set method. Edge to Edge setup begins with defining the size of the entire space. Multiple patterns are resized and stitched inside that space. Each time the quilt is rolled, Roll Quilt is used to synchronize the position of the quilt with the patterns shown on the screen. End of Set roll quilt method works best when the start point and endpoint of the pattern is along the bottom edge of the design, not the top. If the selected pattern doesn’t comply, CS will prompt you to choose the Place Two Pins method. Other Roll Quilt methods are explained in other articles.
Edge to Edge (E2E) consists of two sequences:
- Setup: the quilt dimensions, pattern sizes, and other metrics are chosen.
- Roll Quilt: the process of synchronizing the screen image to the new position of the quilt.
Important: Remember to measure your quilt length prior to placing it on the frame for the most accurate results.
|
In the Pattern or Project tab, select your pattern by clicking on it. Then, mode to and select or click the Edge to Edge icon. Follow the directions to define your quilting area by clicking the upper right corner of your stitching space (you may wish to go just outside the area you wish to quilt). Select OK on your keypad to mark that point. Continue following the prompts to mark your upper right corner, lower right corner, and lower left corner. |
 |
|
Next, you will be prompted to enter your quilt length in inches in the setup tab on the right. Enter the length and press enter on the keyboard. Important: Remember to measure your quilt length prior to placing it on the frame for the most accurate results. |
 |
|
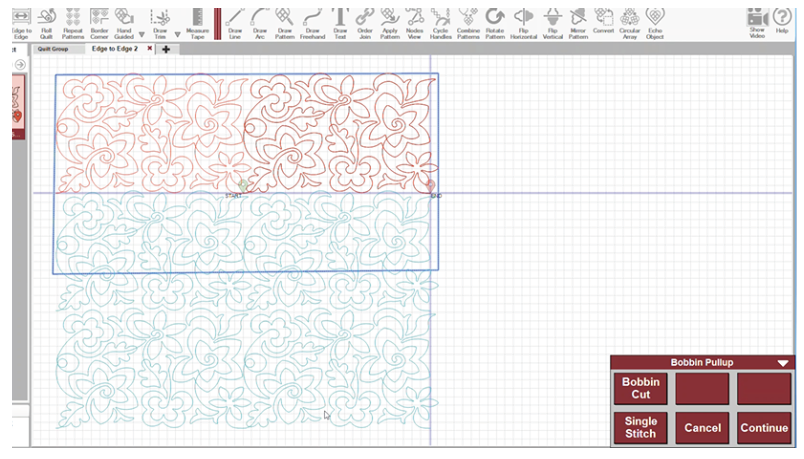
Patterns will place themselves on the screen and the rest of your setup window settings will now be available to adjust. The quiltable area is indicated by the blue boundary on the CAD. A black row indicates the pattern row is fully in the quiltable space and ready to quilt. Teal patterns indicate that part or all of the row is outside the quiltable area. You can change the pattern being used simply by selecting another pattern in the Pattern or Project tab. |
|

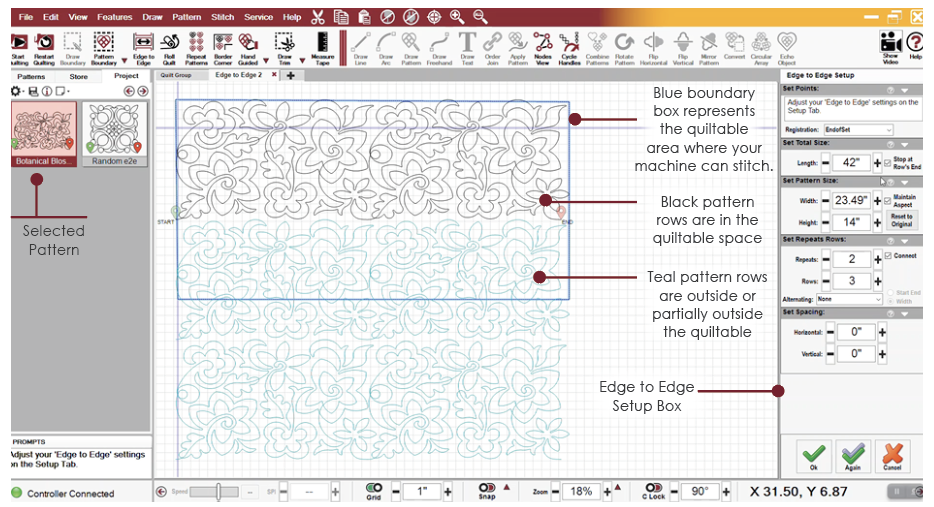
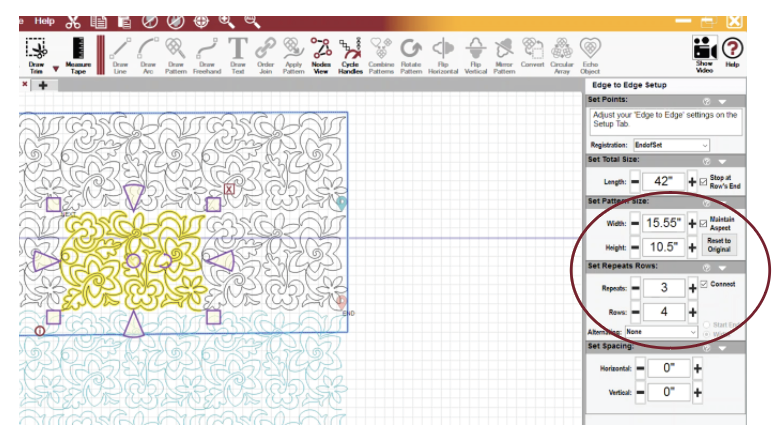
Changing Pattern Density - Set Pattern Size, Repeats and Rows
You can click an individual pattern in the set up to zoom in and inspect the density of the pattern. If you wish to make the pattern more dense, you can decrease the pattern width or height. To make the pattern less dense, increase the pattern width or height. This will automatically change the number of repeats and rows that fill the quilt size.
Nesting Rows - Set Spacing
You can change the spacing of the rows and how the patterns nest or fit together by adjusting the horizontal and vertical spacing. In this example, we have decreased the vertical spacing to create a more continuous effect. CreativeStudio will automatically adjust the pattern size and the number of rows and repeats as needed to fill the space.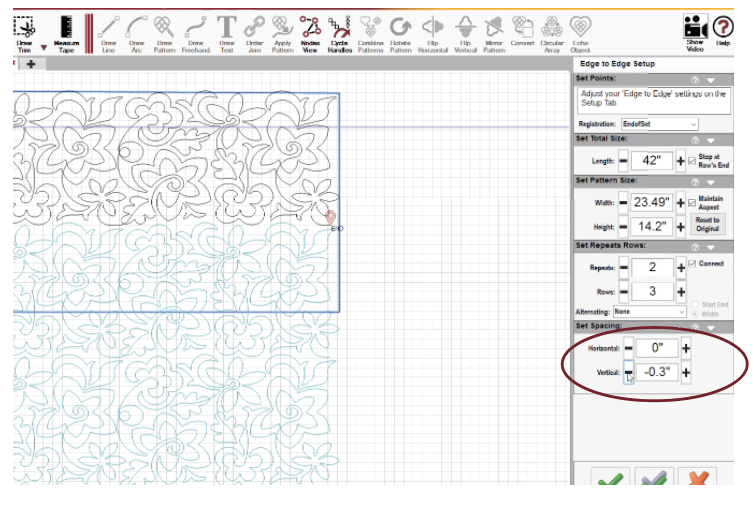
Pattern Height
Check your pattern height to ensure that you have plenty of space to quilt your designs once you begin rolling the quilt. As the quilt is rolled onto the pickup bar, you will have less quiltable area. How much area is available will depend on the size of your machine head as well as factors like the thickness of the quilt batting and fabrics and the length of the quilt.
Completing Setup
|
Once you are done making changes in the setup tab, click OK to accept the changes and close the tab.
|
 |
|
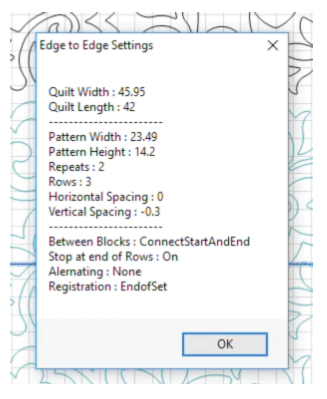
Once the setup window is closed, the Edge to Edge settings can no longer be changed. The settings can, however, be viewed by right-clicking on the CAD screen and selecting E2E Settings.
At this point, you can make some changes to patterns on the CAD screen if desired.
Now, you are ready to begin quilting. |
|
VIDEO | Edge to Edge Setup
Begin Quilting
From the head of the machine, mode to Start Quilting and press Select. The machine will move to the start position and take a single stitch. Pull up your bobbin thread as prompted and click Continue. The patterns will stitch continuously to the end of the row at which time the stitching will tie off. The pattern will turn red as it stitches indicating completed stitching.
Once the row has completed stitching, you will hear a ding and be prompted to bring up the bobbin thread and cut the thread. Click Continue when done. It is now time to roll your quilt.
Roll the Quilt Using End of Set
|
Physically roll the quilt When all patterns in a quilting area have been stitched, pull up the bobbin as prompted and click Continue. Push your machine to the back to give yourself an idea of how far to roll the quilt to reach the next row. Next, physically roll the quilt to prepare to quilt the next row. |
 |
|
Baste the sides of the quilt Mode to Hand Guided and select baste (or the hand guided setting of your choice) and baste the sides of the quilt. Exit hand guided mode by holding Shift and selecting Exit. |
 |
|
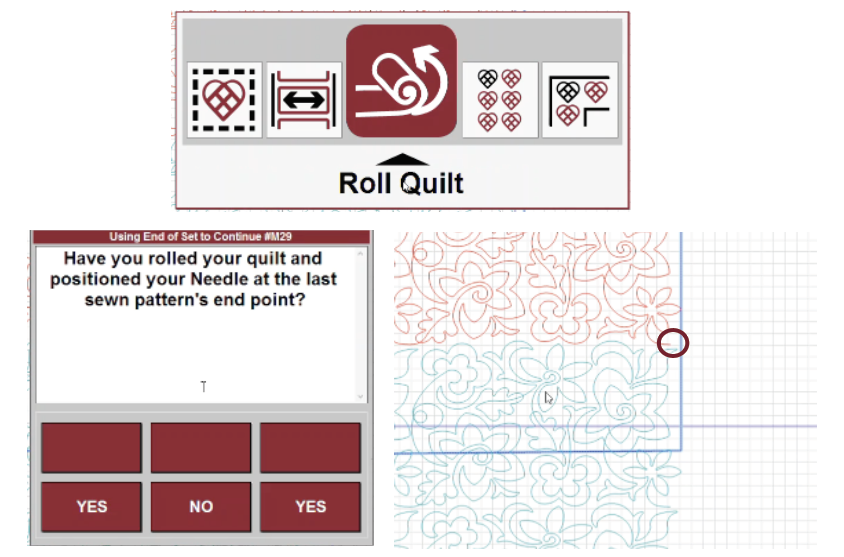
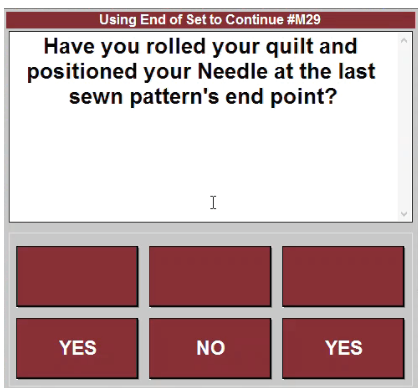
Roll Quilt Mode to Roll Quilt and select it. Or click the icon on screen. You will receive a message asking if you have positioned your needle at the last sewn pattern’s end point. Ensure that your needle is over that last point and select Yes. |
 |
|
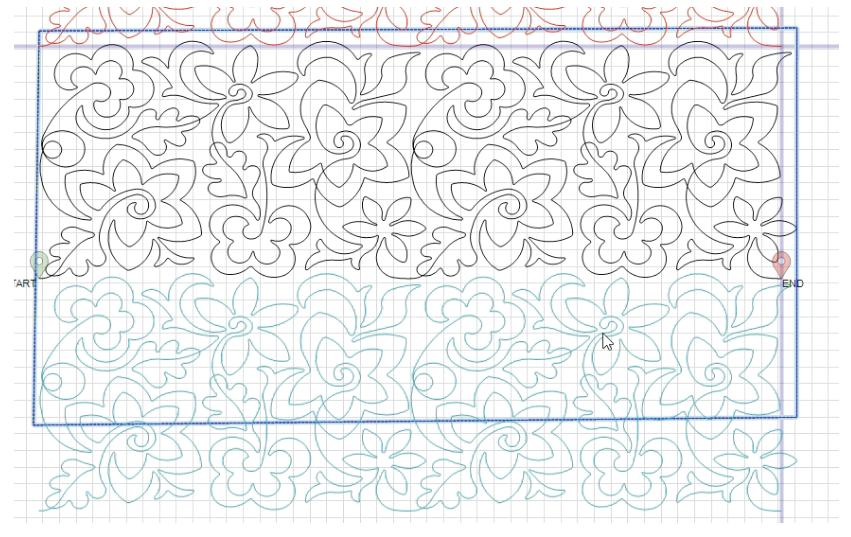
Resume Stitching You should now have a row of black (unsewn) quiltable patterns in your stitchable area. Mode to Start Quilting and select it or click on the icon. Pull up your bobbin thread and select Continue. The row will stitch. Repeat this process until you reach the bottom of the quilt. |
 |
|
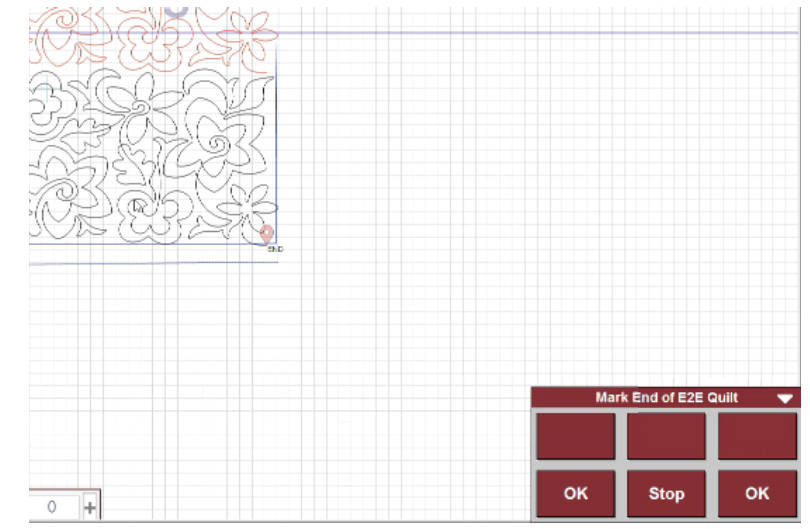
Mark End of E2E Quilt When you have rolled to your last row and selected Roll Quilt, you will receive a message to Mark End of E2E Quilt. Use the machine head and the OK button to mark multiple points along the bottom of your quilt. You can also mark the sides if you wish. These points will create a new boundary line you can then use to adjust your patterns. |
 |
|
Adjusting the Patterns Your patterns may need to be adjusted. To do so, marquee select the remaining black row(s) of patterns and use pattern handles to adjust. Once you are happy with the results, mode to Start Quilting and select it or click the icon on screen. |
 |
Intro to Registration Points
Beginning an Edge to Edge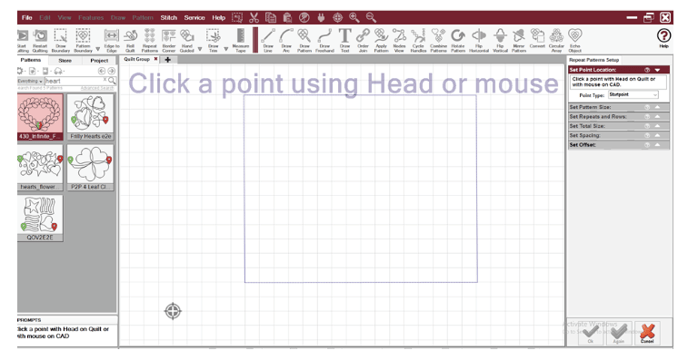
You will begin your edge to edge by selecting your pattern, choosing Edge to Edge and then
following the prompts to select your boundary.
Next, you will enter your quilt length.
From here, you can begin to use the setup box and change your registration point.
Registration points are needed for CS to maintain the overall layout while stitching a section at a time. Edge to Edge feature has three different methods for marking registration points. The registration points will determine the steps you take to roll the quilt.
End of Set requires no marking. You just need to be able to reach the last stitch of the last pattern in the row.
Place 2 Pins means CS creates the registration point and instructs you to mark them before you roll the quilt.
Use Start and End Points requires no marking, just the ability to reach the first and last stitches of the last row quilted.
End Of Set
VIDEO | End of Set
This method works best when the endpoint of the E2E pattern is along the bottom edge, not the top. If the selected pattern doesn’t comply, CS will prompt you to choose the Place Two Pins method. The reason for the warning is because if the last stitch taken will be toward the top of the pattern it could easily be rolled up far enough to be unreachable. If you decide to ignore the suggestion, be sure to allow access to the end point of the last pattern sewn.
Advancing the Quilt using End of Set
Follow the Quick Start instructions for quilting your first section. When it is time to advance your quilt, physically roll the quilt and baste. Use the mouse or machine keypad to select roll quilt. Place the machine head and needle over the last sewn pattern’s end point (the last stitch taken) as prompted by CS. Select Yes once this is complete. All patterns in the E2E setup will be shifted up on screen and the next rows to quilt will be black. You are now ready to begin stitching again.
Use Start Point and End Point
VIDEO | Use Start Point and End Point
 This method works best when the start point and endpoint of the E2E pattern are along the bottom edge, not the top. If the selected pattern doesn’t comply, CS will prompt you to choose the Place Two Pins method. The reason for the warning is because if the start and end are toward the top of the pattern, they could easily be rolled too high to be reachable. If selecting to ignore the suggestion to change to Place Two Pins, be sure to allow access to the start and end points of the last pattern sewn.
Advancing the E2E using Start and End Point
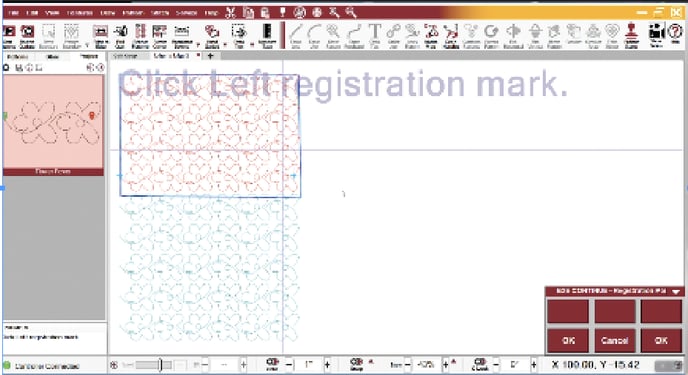
When it is time to advance your quilt, physically roll the quilt and baste (see Quick Start section). Use the mouse or machine keypad to select Roll Quilt. The instructions will ask you to click the left registration mark. This is the start point of the last row of patterns stitched, in other words, the first stitch taken on the final row. Next, click right registration mark, which is the end point of the pattern or the last stitch taken. You are now ready to begin stitching again.
Place Two Pins
VIDEO | Advancing Edge to Edge Place Two Pins
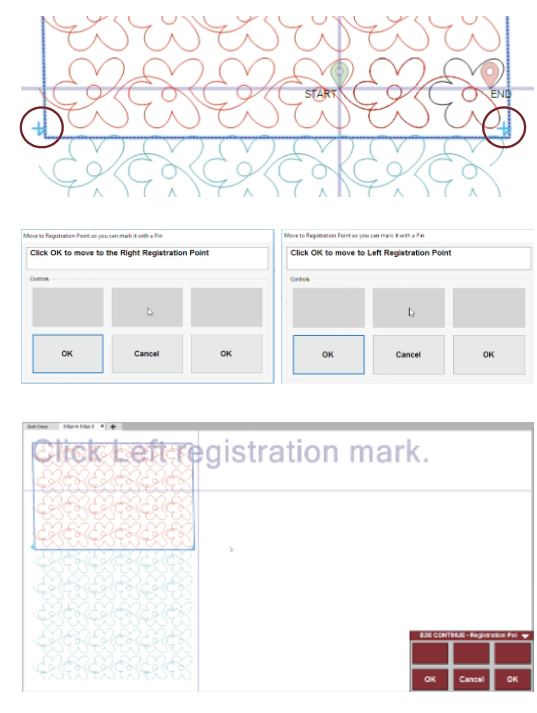 Place Two Pins does not require being able to reach the last stitch of the previous rows. Follow the same process as other methods for setup and initial stitching, except chose Place Two Pins under registration. You will notice the blue registration marks prior to stitching.
Advancing using Place Two Pins
When it is time to advance, unlike the other two methods, you must first take steps prior to physically rolling the quilt. Cut the bobbin from the final stitch. Once you have cut the bobbin thread and clicked Continue, CS will instruct you to click OK to move to the Right Registration Point. When you click OK, the machine head will automatically move to the blue registration point on the right and lock into place. Here, you will need to mark the quilt. You can use a pin to mark the point or a piece of painter’s tape with a dot directly under the laser light. Once your point is marked, as prompted, click OK to move to the left registration point and repeat the process. It’s now time to physically roll the quilt, baste (see Quick Start Chapter) and use the Roll Quilt icon.
Once the quilt is rolled, you will be prompted to click the left registration mark. Put your laser light on that mark and select OK. Repeat with the right registration mark. Your patterns will shift up into your new stitchable area and you are ready to quilt.
Finishing an Edge to Edge
The last sections always have an additional prompt, Select points along bottom of E2E. This will create a boundary line on the screen, showing the very end of the quilt. Use as many ‘clicks’ as need to follow the edge closely. Once this is done, the unquilted patterns on the screen can
be resized to fit inside the bottom-edge boundary. Alternatively, if resizing the patterns would
distort the design, Use Trim or Fill to remove the excess pattern sections.
Edge to Edge and Repeat Patterns
VIDEO | Switch from Edge to Edge to Repeat Patterns.
There is another technique for Edge-to-Edge quilting using the Repeat Pattern Feature, where CS does not control the details, you do. You can choose to switch from E2E Automatic to E2E Repeat Patterns in the middle of the project, just by using the Relocate feature. Once relocate finishes, E2E no longer controls the Roll Quilt process. Using the Relocate feature for any reason may force an Automatic E2E to convert to a Repeat Pattern E2E.
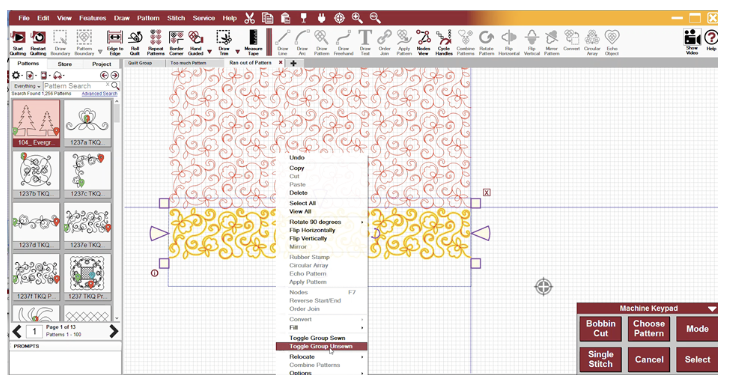
Overall quilting with Repeat Patterns will not have teal patterns that are unstitchable below the belly bar boundary. Therefore, you, the quilter, are responsible for making sure the machine head does not move to try to stitch rows that are unreachable. For patterns outside the boundary, it is wise to select the group and “Toggle Group Sewn”. This helps prevent the machine from hitting the belly bar. Each time you roll the quilt, you will use Roll Quilt or Relocate again, to synchronize the screen with the quilt. You will also need to change the sewing status of the patterns in the boundary.
Overall Quilting Setup Using Repeat Pattern
There are times when E2E automatic is too rigid, and you will want to plan and control an Edge-to-Edge process manually. The safest way to do this is to develop a master plan, which is a diagram showing the outline of the quilt, and showing the layout of the patterns.
Here is a suggestion for creating a master plan:
- Draw a square pattern using Draw Line, or choose the Geometric Square pattern.
- Change the square pattern's dimensions to match the quilt size.
- Position the Upper Left corner of the pattern to the Upper Left corner of the quilt.
- Convert the pattern to a boundary (represents the entire quilt).
- Draw a boundary around the quiltable space of the quilt.
When following these steps, turn on the Crosshairs, so you can be sure your diagram is aligned to the quilt. When identifying your quiltable space, use the upper left and upper right corners of your quilt top, and the lower left and lower right points along the belly bar.
Here is a suggestion for creating the pattern layout using Repeat Patterns.
- Choose the pattern and modify the pattern properties as needed.
- Click Repeat Patterns Icon.
- Set the (Repeat Pattern) Point Location to Type = Upper Left Corner.
- Click on the upper left corner of the quilt; one pattern is displayed.
- Change settings as needed to fill the space.
- Click OK when done.
The Repeat Pattern Settings display the changes dynamically so you can audition multiple patterns if needed. If you like what you see, click OK. To exit, click Cancel.
- Quilt one section at a time. Select all patterns that can’t be quilted in the first section. Toggle them sewn.
- Quilt as much as possible. Before rolling the quilt, toggle the next row of patterns as ‘unsewn.’ This will be your first row of the next section.
- When ready, roll the quilt.
You can use Roll Quilt End of Set to advance the patterns on screen or use the Relocate feature.
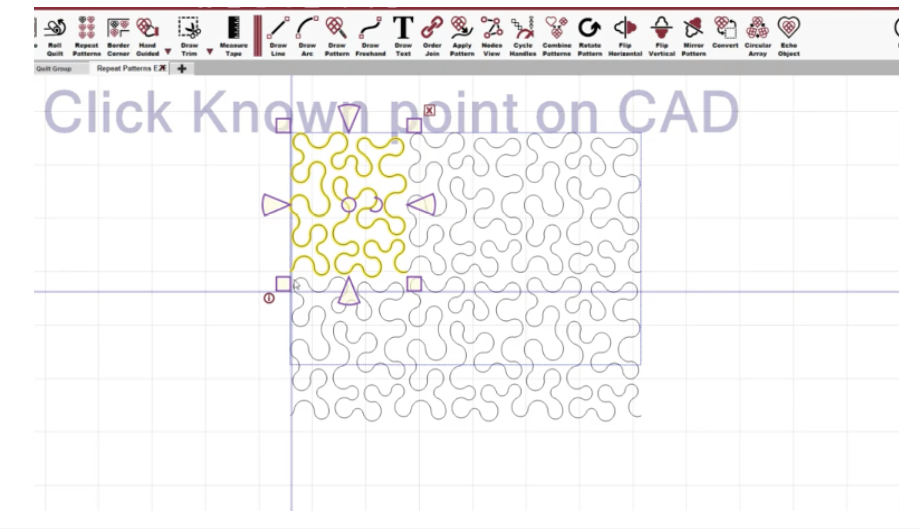
Repeat Pattern Relocate will synchronize the screen images to the new quilt position. Here is a suggestion for realigning the quilt to the screen image, after rolling.
- Toggle the next row(s) as unsewn.
- Find an easily accessible spot in the last row quilted. Choose a spot that is pointed or where the pattern crosses over itself. Curves are not good choices.
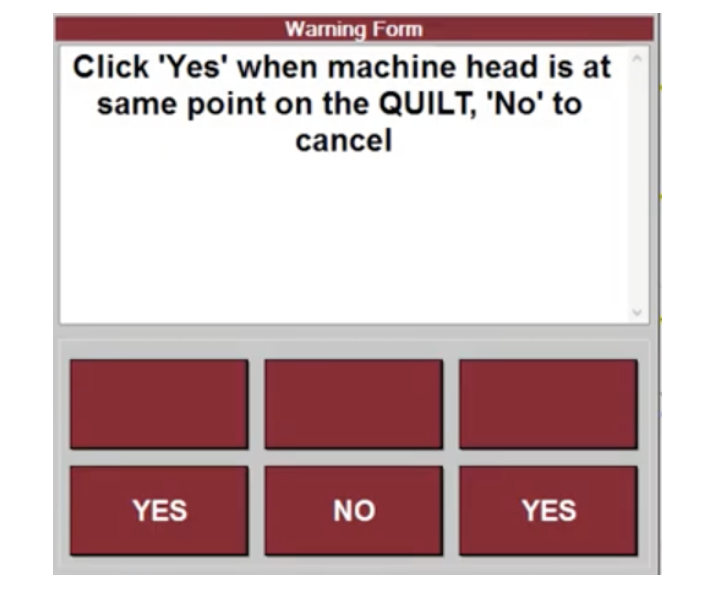
- On the screen, Right Click any pattern. Choose Relocate. Choose Shift All to 1 Point. #4 With the mouse, Click on the (easily accessible) Known Point on CAD.
- Move the stitcher to this same point on the quilt. Click “YES”.
All the patterns will shift up, but the boundaries don’t, so the boundary around the quiltable space should still be accurate. Double check that the ‘unsewn’ patterns are all inside the boundary.
Continue to quilt, roll and relocate until the last section. Draw one more boundary along the bottom edge to check the alignment. Adjust the last rows if needed.
E2E Troubleshooting
Thread Break/Bobbin Run Out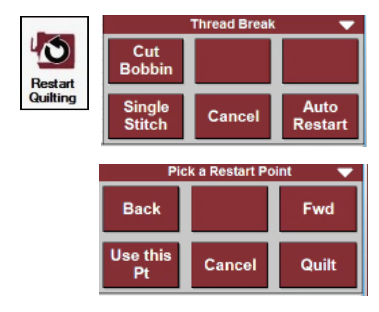
Auto Restart is triggered when the machine detects that the top thread has stopped moving, like when the top thread breaks. If the top thread is NOT broken and the bobbin has not run out, wrap the thread around the thread break sensor one more time and resume stitching. If the bobbin has run out, the machine may not stop immediately because the thread break detection happens when the top thread stops moving. Rethread and replace your bobbin as needed and trim threads. You may wish to remove the last few stitches if they are loose. Select Auto Restart and the head will move to the location where it stopped moving. Move the head to a new position if needed and select Use this Pt (Point). Use the Back and Fwd buttons to ensure you are in the correct spot. You may wish to move a few stitches back to overlap stitches. Once you are in the correct location, select Quilt. From here, pull up your bobbin and resume quilting. If you cancel stitching yourself, restart using the Restart icon. Then select your position for Use this Pt and continue as outlined above.
Too Much Pattern at the Bottom of an E2E
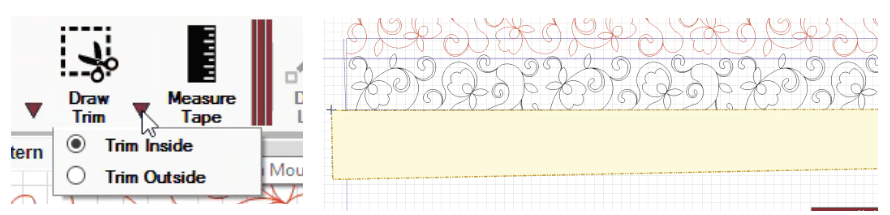
When you have excess pattern at the end of a quilt, for small adjustments, simply select the unsewn last row and use the handles to adjust the size. If there is a great deal of pattern left, you may need to use Trim or Fill to remove excess pattern sections. Select Draw Trim (Trim Inside). Using the mouse, draw a trim over the area you don’t wish to sew. This will be the area below the new boundary you drew when prompted to Mark End of E2E Quilt. Draw Trim will be covered in more detail later.
Too Little Pattern at the Bottom of an E2E
Select the last row of patterns and right click. Select Toggle Group Unsewn. You now have another row of patterns available to stitch. Use Roll Quilt (End of Set) and select the last stitch of the last row stitched as your End of Set Point. You will be prompted to Mark End of E2E Quilt. You may now have extra pattern below the new boundary. Use one of the methods outlined in the "Too Much Pattern at the Bottom of an E2E" section to deal with the extra patterns.
VIDEO | Too Much or Too Little Pattern in E2E
Relocate Stitcher
Whenever the screen and the quilt are out of alignment, you can use Relocate. You may need to use relocate after restarting your machine in the middle of a project if care was not taken to choose the same Point of Origin on startup each time. Relocate can also be used to leave E2E mode and finish an overall setup in Repeat Patterns E2E. This enables all features that may be unavailable in E2E mode.
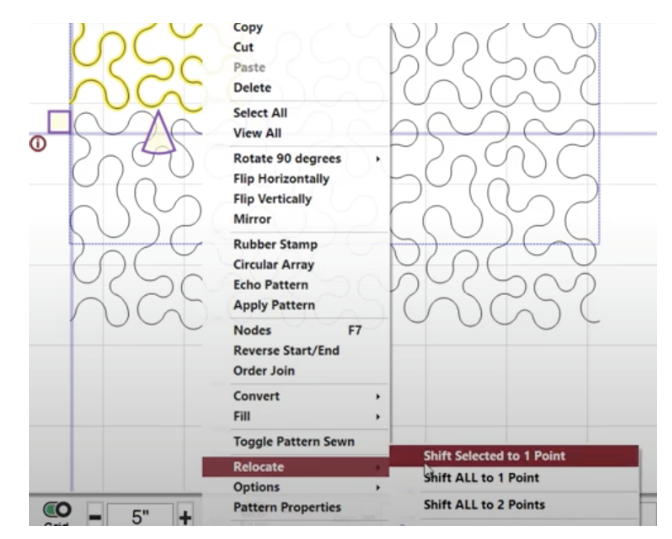
Relocate is found in the Pattern right-click menu.
There are four Relocate options. Each one is detailed below.
Shift Selected to 1 Point
VIDEO | Relocate Selected to 1 Point
|
To shift Selected to 1 Point, use the mouse right-click the pattern(s) you wish to shift to a new location and select Relocate and Shift Selected to 1 Point. If you wish to move all patterns using this method, use Ctrl+A or use the mouse to marque select all the patterns before choosing Relocate. |
 |
|
As prompted, use the moue to cli |
 |
|
Once you have found your known point on the CAD screen and clicked with the mouse, you will be prompted to find the same point on your quilt. Move the machine head into position at that point and click Yes. |
 |
|
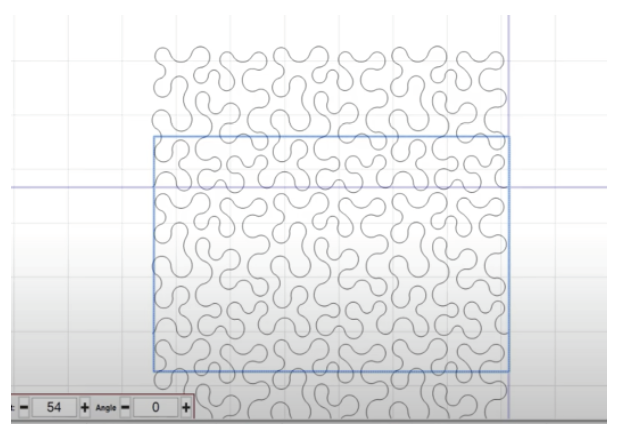
You should see the selected pattern move to its new location. Because boundaries do not move, you may need to draw a new boundary prior to quilting. |
 |
 ck a known point on the CAD screen. This should be a point that is easy to accurately find both on the screen and on your quilt. For instance, the start or end point of a stitched row.
Shift All to 1 Point
VIDEO | Shift All to 1 Point
|
To Shift All to 1 Point, use your mouse to right-click on any pattern on your screen and select Relocate and then Shift All to 1 Point. Follow the instructions on screen to choose a single point on screen and the same point on the quilt. In this case, once the process is complete, all patterns on the screen will shift to the new point. Boundaries and trims will not relocate. |
 |
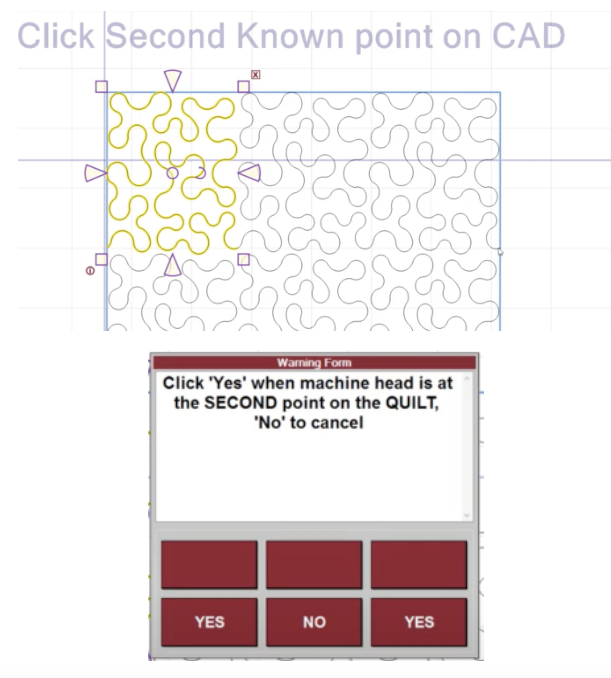
Shift All to 2 Points
VIDEO | Shift All to 2 Points
|
To Shift All to 2 Points, use the mouse to right-click on any pattern on your screen and select Relocate and then Shift All to 2 Points. This process will follow the same method as the previous two sets of instructions except you will be asked to use your mouse to click a TWO known points on the CAD screen before selecting the same two points on the quilt. This method will allow you to relocate patterns at an angle so it is a good idea to select points on opposite ends of your quilt. Once the process is complete, all patterns on the screen will shift to the new location. |
 |
Relocate Project Origin
VIDEO | Relocate Project Origin
Relocate Project Origin is sometimes the best option when an Edge-to-Edge needs to be realigned. This method allows for drawing a new boundary and does not require the E2E setup change to a Repeat Patterns E2E. Choosing any other option for an E2E will convert the E2E automatic process to Repeat Patterns E2E.
|
To Relocate Project Origin, use your mouse to right-click on the first pattern in the LAST ROW STITCHED. Select Relocate and then Relocate Project Origin. Follow the instructions on screen to mark out a new boundary and place the needle on the start point of the first pattern in the last row stitched. In this case, once the process is complete, all patterns on the screen will shift to the new location and the boundary should be accurate to the actual quilt. |
 |