
In this section, you will learn:
• Proper threading of the machine including the top and bobbin threads.
• Adjusting the tension for both threads.
• Checking stitch quality.
Improper threading of the machine can result in poor stitch quality and broken threads. If you are experiencing numerous thread problems, the first thing you should do is check that the machine is properly threaded. Often it is as simple as the thread being out of a single thread guide.
Threading Parts
|
Thread Guides and Thread Posts The purpose of these elements of the thread path is to position the thread for other elements such as the tension devices, needle and the take-up lever. Thread guides and posts may seem unimportant, but if one is omitted or improperly threaded you can have as poor stitch quality as you do if the tension is improperly set or the timing is off. |

|
|
Thread Break Sensor When the top thread breaks, the thread break sensor stops turning and sends a signal to the computer which notifies you of a thread break. |

|
|
Intermittent Tension This first tension device is used to add tension to the top thread. The tension is needed to prevent slack in the thread as the take-up lever moves down. The take-up lever moves up to pull out any slack in the top thread as the stitch is completed. The intermittent tension consists of a thread guide just before it and two symmetrical discs. The thread runs between the two discs and the tension is adjusted by a knob which moves the discs closer or farther apart to create or reduce tension on the thread. The intermittent tension is the tension adjustment device for the top thread. Tightening or loosening the pressure between the two discs adjusts the tension. |

|
|
Rotary Checks Spring Assembly The rotary check spring device consists of a thread post, a wheel with an adjustment knob, a check spring, and finally another post. The thread is placed over the first post, wrapped around the wheel, over the check spring, and under the second post. The assembly should be adjusted so that, as the thread is pulled from the needle, the wheel turns. Turning the knob will not adjust the tension. Caution: Be careful the thread does not come out of the wheel’s shallow groove. |

|
Threading Chart


Threading Written Instructions
Cone holder
Place the cone on the cone holder as shown. This holder can be rotated about the handle and should be positioned such that the center of the cone is directly below the first thread guide.
Thread Lead Off
This thread lead off has two holes. The first hole is parallel to the floor and the second is parallel to the wall. Thread the first hole from bottom to top then thread the second hole from back to front.
Thread Post
Thread from back to front.
Intermittent Tension
Thread through the small post before threading counterclockwise through the intermittent tension device, approximately 3/4 of a turn. Then back out through the small post.
Thread Break Sensor
Thread counter-clockwise around the thread break sensor, one-and-a-half times around. For a more slippery thread, you may need to go around a few more times.
Three-Hole Thread Guide
This guide has three holes. Do not use all three holes. Use the first and last holes only. The first hole is threaded from the bottom up and the third hole is threaded from the top down.
Rotary Check Spring Assembly
Thread over the first post, clockwise around the rotary tension wheel 1 ¾ times, over the check spring, and under the second post. The thread must be wound around the rotary check spring assembly 1 3/4 times.
Take-Up Lever
Thread from back to front.
Thread Guides
Thread through all thread guides from top to bottom.
Needle
Thread the needle from the front to the back of the machine.
Setting the Intermittent Tension
Intermittent tension adjustments might be needed on every quilt combination you do because the thread, fabric, batting and backing all affect the stitch quality.
When to Change the Intermittent Thread Tension
If the tension is poor on the back of the quilt - top thread loops, bobbin thread lying flat, eyelashes or stitches not embedding in the fabric - then tighten intermittent tension ½ turn at a time to “pull” the stitch (the bobbin and top thread connection) into the middle of the quilt.
To set the Intermittent Tension: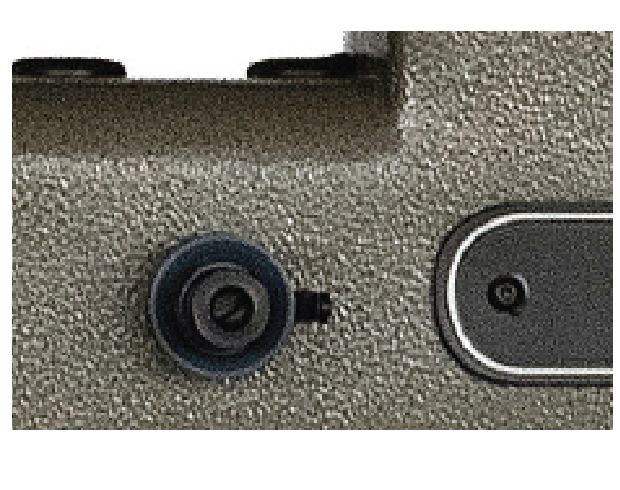
Start with the Intermittent Tension set at the baseline by turning the knob until it is flush with the inside threaded shaft.
Turn the knob a half turn to the right (clockwise) to tighten and the left (counterclockwise) to loosen. When adjusting the tension, always turn the intermittent tension knob at least half a turn at a time. It is a coarse adjustment and less than a half of a turn will not considerably change the tension.
Tip: If the tension is too tight or too loose, the thread will quickly work its way out of the disks. Be sure the thread stays nestled between the two tension disks. If it slips out, the quilt will have poor tension.
Using Spool Thread 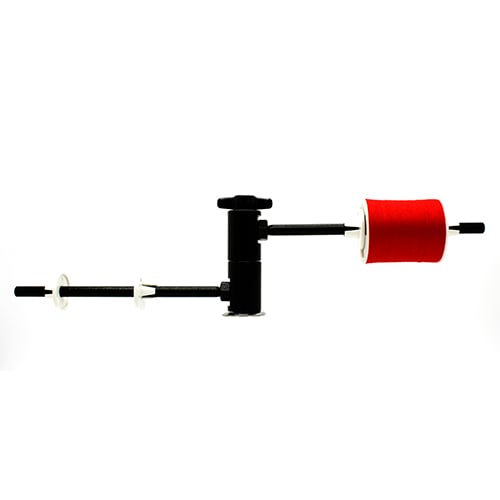
When using spool thread, the spool is placed on the horizontal spool holder. The spool holder mounts to a threaded screw hole on the machine body just forward of the motor, or alternatively to a threaded screw hole on top of the motor belt cover. The thread should come off the spool from the bottom so that the spool rotates clockwise when the thread is pulled. Rotate the spool holder so it is perpendicular to the upper arm. Begin threading with the first post leading to the intermittent tension.
Changing Thread
It is not necessary to re-thread the machine each time you change the thread. Simply cut the old thread before the first thread guide, leaving the machine threaded. Put the new spool or cone on the machine and tie the end to the old thread that is still in the machine. Unthread just the needle and pull the old thread until the new thread appears. Cut off the old thread and thread the needle with the new thread. The tension should be checked each time a new thread is added.
Video | Replacing the Rotary Check Spring
The Rotary Check spring Assembly is pulled and released each time a stitch is made. This repetitive movement causes the thin material to fatigue and break over time. It is a good idea to have two spare check springs on hand. Check springs are easy to replace and it is not necessary to disassemble the entire device to replace it. 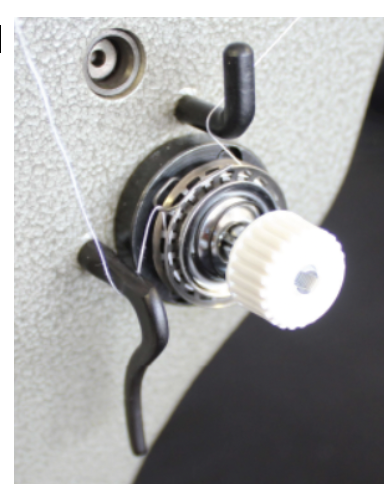
Using a 1/16 Allen wrench, loosen the small set screw located in the edge of the black tension ring at approximately the 3:30 position.
Remove the entire assembly from the ring and locate the set screw at the backside of the housing that holds the tension shaft in the housing. Loosening this set screw allows the removal of the shaft and the broken check spring.
Replace the check spring by threading the end of the new check spring through the slot in the housing and forcing the coil portion of the check spring back into the housing. Install the tension shaft back into the center of the coil's spring and rotate until a part of the check spring fits into the groove in the tension shaft. When this is done, the arm of the check spring will move as the shaft is rocked back and forth. The proper adjustment of spring strength is achieved by rotating the shaft clockwise until the arm of the spring rests against the right side of the slot (or notch), then continue to rotate the shaft clockwise until the spring passes three spokes on the side of the rotary wheel or 1/6th of a revolution, which adds the proper strength to the check spring.
Tighten the shaft set screw on the housing and install the housing back into the black ring. Set the radial position of the tension so the bottom of the hoop of the check spring is at 10:30 o’clock (halfway between 9:00 and 12:00).
Caution: do not push the housing so far into the ring as to cause the check spring’s arm to touch the black ring.
Tighten the Allen set screw. The proper adjustment of regular tension is usually with the thumb nut even with the end of the tension shaft.
Note: Many times after a thread break, the thread will wrap itself around the check spring. Prior to re-threading the machine after a thread break, check that the thread is not wound around this check spring.