
View Commands
View commands control the way you view your screen, and the way you interact with it.
VIDEO | View Commands
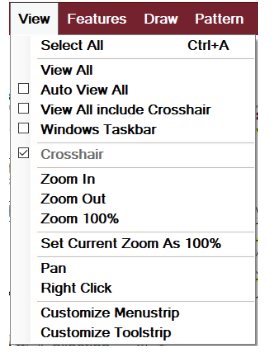
Select All |
Will select (highlight) all the patterns in the quilt group. |
View All |
Changes the Zoom perspective so all patterns in the current quilt group are visible. |
Auto View All |
Automatically changes the zoom perspective to include all patterns when performing key features. Unchecking this gives you more control of the perspective. |
View All include Crosshair |
Will change the zoom perspective to include all patterns and the crosshair location. |
Windows Taskbar |
Shows (or hides) the taskbar at the bottom of the screen. |
Crosshair |
The location of the stitcher is shown, using two light blue lines (H & V). |
Zoom In |
Enlarge the image; the same thing as rolling the mouse wheel forward. |
Zoom Out |
Reduce the image size; the same as rolling the wheel backward. |
Zoom 100% |
Adjusts the zoom perspective, to match the size set as 100%. |
Set Current Zoom as 100% |
This command allows calibration of the gridlines on the screen. Zoom in or out to attain the correct size then choose “Set Current Zoom as 100%”. |
Pan |
The Pan command will allow the screen to be moved in all directions, without changing the Zoom perspective. The same as holding the mouse wheel while dragging the mouse. |
Right Click |
Many of the CS features are found by right-clicking an object. When a touchscreen monitor is being used and there is no mouse device, CS needs to have an alternative method of initiating the right click of an object. Click this icon first, then the object, and the Right Click Options appear. |
Customize Menustrip |
Allows you to rearrange the icons in the menu strip. See below for details. |
Customize Toolstrip |
Allows you to rearrange the icons in the tool strip. See below for details. |
VIDEO | Menustrip View Menu
Menu Strip and Tool Strip

The menu strip is at the top of the screen, to the right of the command menu choices. These icons are shortcuts for pattern manipulation (EX: cut/copy/ paste/print). The icons can be rearranged as needed. Command menus can not be moved. When Customize Menu Strip is selected, a dialog box appears that allows icons to be included / excluded / rearranged. It allows the new layout to be saved as a preset, and exported if desired. This process is explained on the next page.

The tool strip is below the menu strip, and it contains icons for quilting functions. Like the menu strip, not all icons need to be selected/displayed, and the position of the icons can be changed as needed. When Customize Tool strip is selected, a dialog box appears that allows icons to be included / excluded / rearranged. It allows the new layout to be saved as a preset, and exported if desired. This process is explained on the next page.
Customize Menu Strip and Tool Strip
To customize, right click on the menu strip or tool strip and select from the Customize Interactions menu.
Available Buttons, on the left side, is a complete list of all available icons / shortcuts.
Current Buttons, on the right side, is a list of icons selected to be displayed.
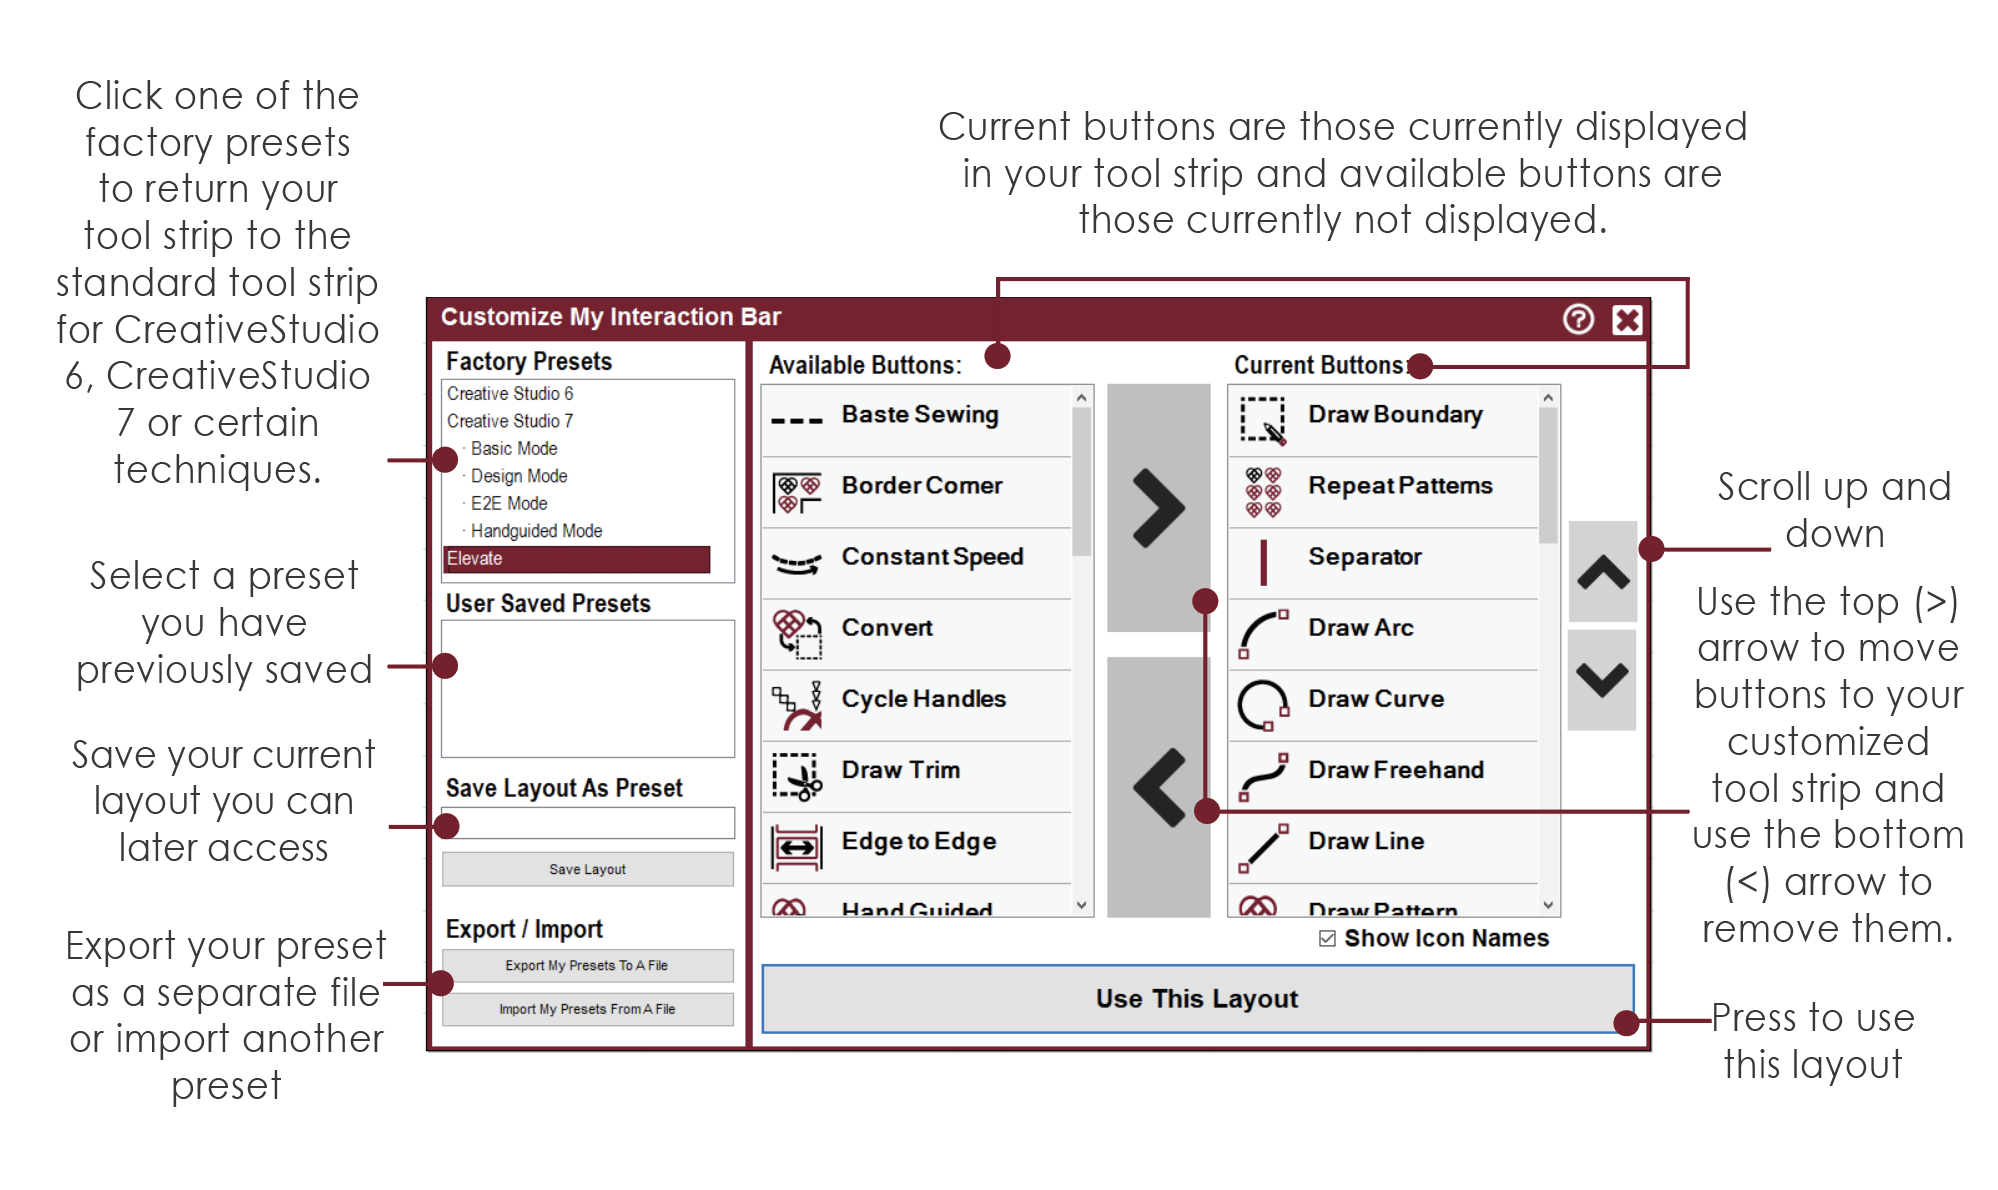
Consider creating a tool strip that has only the icons needed for a particular technique. Some quilting icons are always needed (like Start Quilting) and some are reserved for particular techniques (like Edge to Edge). Give the tool strip a descriptive name and save it so it can be used again. The ability to create customized tool strips for a particular technique saves time and effort. Reminder, the Mode Stop splits the tool strip into two sections. All icons to the left of the Mode Stop can be accessed using the mode button on the keypad, and the icons to the right of the Mode Stop can’t. Pressing the mode button will cycle through only the icons to the left of this icon.
VIDEO | Customize Menu Strip
VIDEO | Customize Tool Strip